_converted")
Quick and Easy Photoshop Tricks for Your iPhone 13
Are you tired of average photos? Do you want to improve your mobile photography? Do you need to take better pictures with your phone? Learn with us how to use Photoshop Tricks on iPhone and edit images like an expert no matter where you are, using the iPhone 13. This guide will teach you both basic and advanced skills for using Photoshop on your iPhone 13. Regardless of your level of experience, you’ll learn how to unleash your creativity and edit your photos like never before.
Inspire Your Creative Potential
While choosing a Photoshop application for your iPhone 13, you are bound to have many options. Here are the five major apps any user could ever need: Adobe Photoshop Express, Adobe Photoshop Touch, Touch Retouch, Face tune, and Picard. All of these apps have varied features and tools thus, it will be good to explore them individually to get to know which one best suits your needs.
Adobe Photoshop Express is a great place for a beginner to start looking at basic editing tools and filters. Adobe Photoshop Touch comes with some more advanced features, including layers and masking. Touch Retouch really excels in removing flaws and imperfections from your photos. Face tune really gets a lot of good press regarding the refinement of portrait features. Picard is an all-in-one app that holds a lot of filters, effects, and editing functions.
If you’re looking to improve your photo-editing skills or just want to explore some creative outlets, these five apps will surely help foster your creativity with your new iPhone 13 and take some higher-level shots.
Learn Photoshop on iPhone Using Photoshop Tricks
 Before you delve into using Photoshop on your iPhone, begin by downloading the right app, such as Adobe Photoshop Express or Adobe Photoshop Touch. Adobe Photoshop Express is ideal for beginners, offering basic tools like cropping, brightness adjustment, and filters for quick photo improvements. On the other hand, Adobe Photoshop Touch is more advanced, featuring capabilities such as layers and masking for detailed edits. Take time to explore these apps’ interfaces and tools once installed, experimenting with filters, effects, and editing options to understand their impact on your photos. This initial exploration will establish a strong foundation for using Photoshop effectively on your iPhone, assuming that you’re new to photo editing or looking to strengthen your skills further.
A Step-by-Step Guide
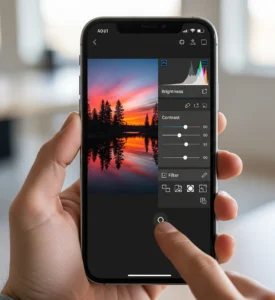
Editing photos with Photoshop on an iPhone 13 is quite easy and very rewarding. First, select the photo you would like to edit, then tap “Edit”. This will open a page for editing with sliders for brightness, contrast, and saturation. At that point, adjust them until your photo looks just right.
Now, apply a special style to refine your image through the “Filters” tool. Some filters are vintage, sepia, and black-and-white, to name a few. Try them all to see what really makes your photo stand out. Add more flair using the “Effects” option, where you can add text, frames, and more to really make your photo stand out.
The steps below will help you edit like a pro on your iPhone 13. If you’re looking to brush up on editing skills or new features, Photoshop is just the right tool to use. It helps you edit your photos seamlessly so that you’re able to explore your creativity and end up with amazing results.
Learning the Photoshop Interface with Photoshop Tricks
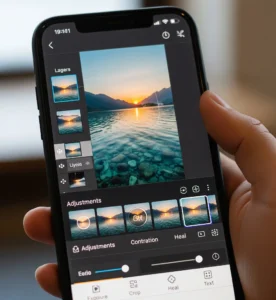 Once you’ve selected the photo you want to edit, the next step is to understand the interface of the Photoshop app. The interface is divided into several sections, including the toolbar, the canvas, and the layers panel. The toolbar provides access to a range of tools and options, including cropping, resizing, and adjusting the photo. The canvas is where you’ll see the actual photo, and the layers panel allows you to create and manage multiple layers.
The toolbar is where you’ll find many of the basic editing tools, including cropping, resizing, and adjusting the photo. You can access these tools by tapping the “+” icon in the bottom right corner of the screen and selecting the tool you want to use. For example, to crop a photo, you can tap the “Crop” tool and then drag the handles to select the area of the photo you want to keep.
Basic Editing Techniques Crop, Resize, and Adjust
One of the most fundamental editing techniques in Photoshop is cropping, which involves selecting a specific area of the photo to keep and removing the rest. To crop a photo, you can use the “Crop” tool, which is located in the toolbar. Simply tap the tool and then drag the handles to select the area of the photo you want to keep.
Another basic editing technique is resizing, which involves changing the dimensions of the photo. To resize a photo, you can use the “Resize” tool, which is also located in the toolbar. Simply tap the tool and then select the dimensions you want to change the photo to.
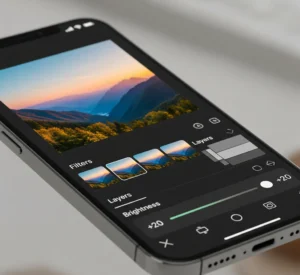
Photoshop Tools and Features on iPhone 13
To get the most out of Photoshop on your iPhone 13, it’s important to understand the basics of the app. Here are some key tools and features to get you started the “Adjustments” panel, which allows you to adjust the brightness, contrast, and saturation of your photo; the ” Filters” panel, which offers a range of filters and effects the “Layers” panel, which allows you to work with multiple layers and masks and the “Undo” button, which allows you to reverse any changes you make to your photo.
The “Adjustments” panel is particularly useful for making basic edits to your photo. You can adjust the brightness and contrast to improve the overall look of your photo, or use the saturation slider to refine the colors. The “Filters” panel is great for adding a unique look to your photo. You can choose from a range of filters, including black and white, sepia, and vintage.
The “Layers” panel is a powerful tool that lets you work with different layers and masks. It’s great for making complex compositions and editing different parts of your photo separately. Also, the “Undo” button is important because it lets you go back on any changes you make to your photo. This means you can try out different edits and settings without worrying about messing up your original photo.
Photoshop Tricks to Remove Blemishes in iPhone
Removing blemishes and imperfections from your photos is easier than you think with Photoshop on your iPhone 13. Here’s a step-by-step guide to help you get started:
- Select the “Touch Retouch” app, which allows you to remove blemishes and imperfections from your photos.
- Use the “Brush” tool to select the area of the photo you want to edit.
- Tap the “Select” button to select the brush size and shape.
- Use the “Erase” button to remove the blemish or imperfection from the photo.
- Use the “Undo” button to reverse any changes you make to the photo.
By following these simple steps, you can remove blemishes and imperfections from your photos like a pro on your iPhone 13. If you’re looking to improve your photo editing skills or simply want to try out new features, Photoshop is the perfect tool for the job.
Editing Photos with Photoshop Tricks Filters and Effects
 Upgrading your photos with Photoshop filters and effects is easier than you think with Photoshop on your iPhone 13. Here are some tips and tricks to get you started:
- Experiment with different filters and effects to add a unique look to your photo.
- Use the “Filters” panel to browse through a range of filters and effects.
- Experiment with different levels of contrast and saturation to enrich the colors.
- Use the “Effects” panel to add a creative touch to your photos.
- Experiment with different styles and effects to add a unique look to your photos.
By following these tips and tricks, you’ll be able to transform your photos and take your photography to the next level. Supposing that you’re looking to improve your photo editing skills or simply want to try out new features, Photoshop is the perfect tool for the job.
Advanced Photoshop Techniques on iPhone 13
Are you looking to take your photo editing skills to the next level? Here are some advanced Photoshop techniques to help you do just that:
- Use the “Layers” panel to work with multiple layers and masks.
- Use the “Masks” feature to work with specific areas of your photo.
- Experiment with different styles and effects to add a creative touch to your photos.
- Use the “Text” feature to add captions or quotes to your photos.
- Experiment with different levels of sharpening and noise reduction to improve the details of your photo.
By following these advanced Photoshop techniques, you’ll be able to take your photo editing skills to the next level and create stunning, professional-looking photos on your iPhone 13.
Unlock Your Creativity with Photoshop on Your iPhone
We have covered each step in using Photoshop on an iPhone 13 for basic steps and more complex methods. Whatever your experience may be, you will learn how to be creative, all the way through coming up with pictures more brilliant than what you had ever seen. Now you can create amazing photo effects using Photoshop on your iPhone 13. Why then wait? Please take time to edit some of your pictures, and you will be surprised at the difference!
Conclusion
Excelling in photoshop on your iPhone 13 opens up endless creative possibilities to improve your photography skills. Through this guide, you’ll gain confidence in using various tools and develop your unique editing style. Either for personal, social media, or professional use, the adaptability of Photoshop apps ensures impressive results with every edit. Embrace learning, explore new techniques, and continually improve to unleash your creativity fully. With Photoshop at your fingertips, the only limit is your imagination. Start editing today and improve your photos to new heights of artistic expression.
Read next: 7 Easy Shutter Tricks to Improve Your Shots


_converted")