Jewelry Photo Editing Guide for a Perfect Results
Editing photos of jewelry is very important when selling jewelry online. With this easy jewelry photo editing guide, you don’t need to outsource your images to photo editing company for retouching. Running a jewelry business online is popular but can be tricky. Being creative and good at marketing is the key, but learning how to edit jewelry photos well is important. In online selling, how your products look is super important, and having great photos is necessary to attract buyers.
Taking good pictures is only the first step; editing them makes them look even better. Poor editing can actually hurt your business. To keep customers happy and help your business grow, you need to get good at editing jewelry photos.
This simple jewelry photo editing guide will teach you step-by-step how to make your pictures stand out. By paying attention to details and using easy editing tips, you can make photos that grab attention and help your online shop grow.
Why Jewelry Photo Editing is Important
Taking pictures of jewelry is about showing how beautiful and shiny your pieces are. But sometimes, the camera doesn’t capture that sparkle well, and the photos can look boring. That’s where editing comes in. Editing software helps make your pictures brighter, clearer, and more attractive to people who want to buy them.
Editing your jewelry photos is really important because it helps you make your products look as good as possible. When you edit well, it can make a big difference in how people see your jewelry and whether they decide to buy it. Good editing can change how people think about your jewelry and make them more likely to want it.
Here’s the Jewelry Photo Editing Guide
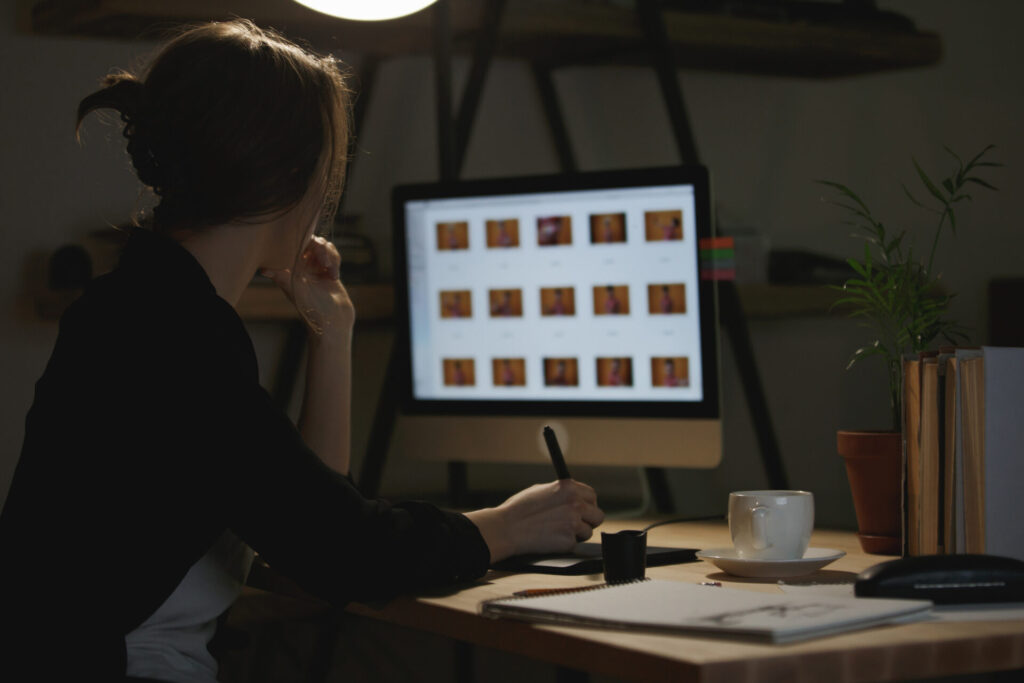
Step 1: Gather the best photos
Before diving into jewelry photo editing, it’s essential to sort through your raw shots and select the best ones. This initial step ensures that you’re only spending time editing photos that will actually be used. Showing different angles of each product helps customers see your jewelry better and understand it more clearly.
While it may seem tempting to discard rejected raw photos immediately, it’s wise to save them for a while as a backup. Experimenting with different lighting, backgrounds, and props is the key to finding what works best for showing off each piece. The goal is to take photos that show the beauty of the jewelry and catch the attention of buyers, making them want to buy. By using these tips and keeping the jewelry’s look real, photographers can create pictures that stand out and help sell.

Step 2: Decide on the editing software to use
The top three editing software used by most graphic artists are Photoshop, Illustrator, and Lightroom, all from Adobe. These platforms offer advanced editing tools that can work wonders on your photos.
Photoshop is incredibly versatile, allowing you to edit a wide range of elements, from graphic layouts to advertising materials. Illustrator is perfect for creating vector designs and infographics. Meanwhile, Lightroom excels in enhancing portrait and wedding photos, offering instant beautification features and a variety of filters.
When it comes to editing jewelry photos, Photoshop is the go-to tool. It offers a comprehensive range of editing capabilities, including color correction, background editing, and photo manipulation. For adding filters, you can explore presets available in Lightroom.
 Step 3: Adjust Brightness and Contrast
The first step in this step-by-step guide is to adjust the brightness and contrast levels. This will enhance the overall appearance of your image and make the colors appear more vibrant. Use the “Brightness/Contrast” tool in Photoshop to make these adjustments.
Adjust brightness and contrast little by little. Too much contrast looks fake, and too much brightness can hide details. The goal is to enhance the jewelry’s natural beauty while still making the image stand out. This step lays the foundation for further edits, so take your time to get it just right.
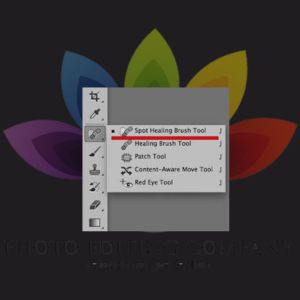 Step 4: Clean Up Your Image
Now it’s time to clean up any imperfections in your image. This could include dust, scratches, or any other blemishes on your jewelry. Use the “Spot Healing Brush” tool to easily remove any unwanted marks. This tool is great for small fixes, but for bigger problems, the “Clone Stamp” tool helps fix the photo smoothly.
A clean image is essential for showcasing the true quality of your jewelry. Customers like pictures that look perfect and professional, so fixing any flaws is an important part of editing.
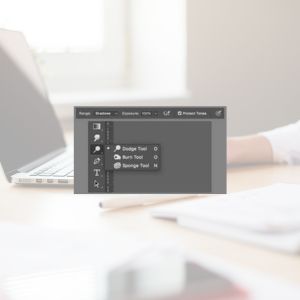 Step 5: Enhance the Sparkle
One of the most important aspects of jewelry photography is capturing the sparkle and shine of your pieces. To enhance this in your photos, use the “Dodge” and “Burn” tools to selectively lighten and darken areas of your image. This will make the gems and metal in your jewelry stand out more. Focus on the highlights to bring out the brilliance of diamonds and other gemstones.
Enhancing the sparkle carefully will ensure that the jewelry’s unique characteristics are emphasized without looking overdone. Subtlety is key; the goal is to mimic how the piece would naturally catch the light and draw the viewer’s eye.
 Step 6: Sharpen Your Image
As mentioned above, jewelry photos must be polished to look attractive and elegant. But removing dust and scratches doesn’t guarantee a gradient shine. Hence, you need another tool for that. Photoshop’s smudge tool (brush-based) can do all the magic and give your pearls or earrings a gradient shine. Simply click the tool, select a brush size, and click-and-drag on the area you want to smudge. If you notice, this is like step 3 in the guide, but it makes your photo look more professional.
Next, use the “Sharpen” tool in Photoshop to bring out the details in your jewelry. This will make your image look more crisp and professional. Be careful not to over-sharpen, as this can make your image look unnatural. A gentle touch is often enough to enhance the fine details without introducing noise or artifacts. Sharpen only the parts that need it, using masks if needed. This keeps the photo looking natural while making the jewelry clear and sharp.
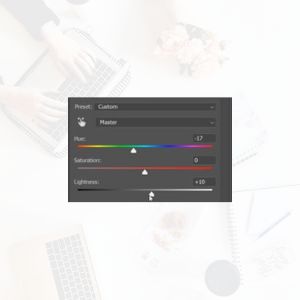 Step 7: Adjust Colors
If you feel that the colors in your image are not true to life, you can make adjustments using the “Hue/Saturation” tool. This allows you to tweak the color tones in your image to make them look more accurate. It’s important to adjust the colors carefully to avoid creating an image that looks over-saturated or unrealistic.
Accurate color representation is important in jewelry photography because customers expect the piece they receive to match online. Use reference photos or the actual jewelry piece as a guide when making color adjustments to ensure accuracy.
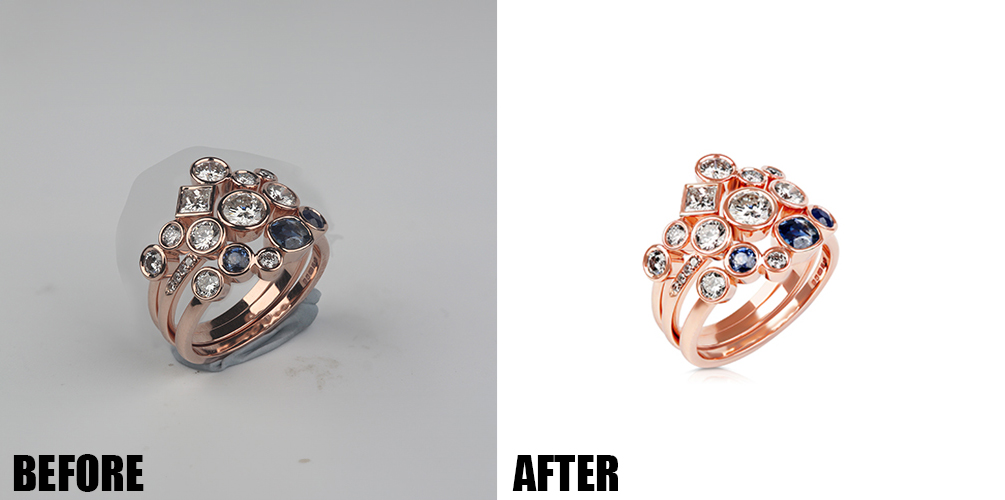 Step 8: Add a Background
To make your jewelry stand out even more, you can add a background to your image. This could be a solid color, a gradient, or even a custom image. Use the “Layers” panel in Photoshop to add a new layer and place it behind your jewelry image. The right background can complement the piece and make it pop, but be sure it doesn’t distract from the jewelry itself.
When selecting a background, consider the style and color of the jewelry to ensure they work well together. A neutral or contrasting background can help to emphasize the jewelry, while a too busy background can detract from it.
Step 9: Add Shadows and Highlights
To give your jewelry photo a more professional and polished look, you can add shadows and highlights. This will create depth and dimension in your image, making it look more realistic. Use the “Dodge” and “Burn” tools to carefully add these shadows and highlights to your image. Remember to consider the light source in your original photo to keep the shadows consistent with the natural lighting.
Adding shadows and highlights can be a soft yet powerful way to enhance the three-dimensional feel of the jewelry. It’s important not to overdo this step, as too much shadow or highlight can make the image look artificial.
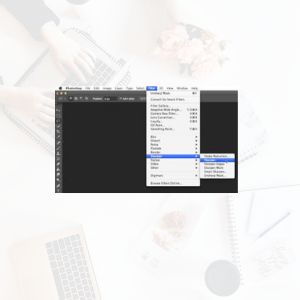
Step 10 : Resize and Save Your Image
Once you are satisfied with your edits, it’s time to resize your image for web or print use. Use the “Image Size” tool in Photoshop to adjust the dimensions and resolution of your image. Then, save your image in the appropriate file format (JPEG for web, TIFF for print). Be sure to use the “Save As” function to keep your original file intact in case you need to make further edits later.
It’s also important to consider the final use of the image when saving. Images for an online store may require different dimensions and resolutions than those for a printed catalog or poster.
Other Tips for Jewelry Photo Editing
- Use a tripod when taking photos of your jewelry to avoid blurry images. A stable setup is essential for capturing sharp, clear images that can be edited effectively.
- Experiment with different lighting setups to find the best way to capture the sparkle in your pieces. Lighting is a critical factor in jewelry photography and can dramatically change the appearance of your photos.
- Don’t be afraid to use filters and presets in Photoshop to speed up your editing process. These can be great starting points, but always customize them to suit the specific needs of your jewelry photos.
- Take multiple shots of your jewelry from different angles to have more options when it comes to editing. Having a variety of images to choose, can also help in showcasing your jewelry in different contexts and angles.
Conclusion
Jewelry photo editing is an essential skill for anyone looking to showcase their pieces in the best possible way. Following this guide, you can easily enhance your jewelry photos to make them look more appealing to potential customers. Remember to experiment and have fun with your edits to find the perfect look for your jewelry images. With practice and patience, you can take amazing photos that show off how beautiful and well-made your jewelry is.
Read Next: Jewelry Photos for Ecommerce Tips for Perfect Results


