10 Practical Lighting Tips for Better Jewelry Photos
Good lighting can completely change how your jewelry looks in photos. Even the most beautiful pieces can appear flat or dull if the lighting is wrong. By following some simple lighting tips, you can make metals shine, gemstones sparkle, and details stand out. Great lighting doesn’t always mean expensive equipment; sometimes small adjustments can create a big difference. If you’re a beginner or experienced photographer, these tips will help you take jewelry photos that look professional and eye-catching.
In this guide, we’ll share 10 practical lighting tips that are easy to apply. You’ll learn how to work with natural light, artificial light, shadows, and reflections to highlight every piece’s unique features. Each tip is designed to help you create clear, detailed, and attractive images. You can experiment with different techniques to see what works best for your jewelry. By the end, you’ll have a better understanding of how lighting can bring your photos, and your pieces; to life.
Use Soft, Diffused Light
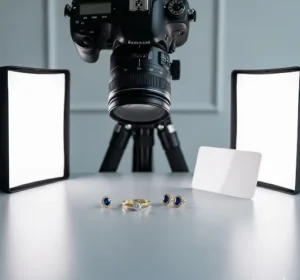
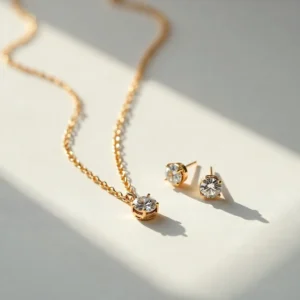 Soft, diffused light is one of the most effective ways to take attractive jewelry photos. Harsh or direct light can create strong shadows and vibrant spots that hide the details of your pieces. Diffused light spreads evenly, reducing glare and highlighting the jewelry’s shape, texture, and sparkle. You can achieve this effect naturally by shooting near a window with sheer curtains, or artificially using a lightbox or soft box. This type of lighting gives a professional, clean look to your images without needing advanced equipment. It also makes editing easier because the colors and details are more balanced.
To get the best results with soft, diffused light, consider these tips:
- Place the jewelry on a neutral background to keep focus on the piece.
- Avoid direct sunlight during peak hours; morning or late afternoon works better.
- Use reflectors or white paper to fill in shadows and brighten details.
- Experiment with the distance of the light source to find the perfect softness.
- Take multiple shots from different angles to see how light interacts with your jewelry.
Jewelry Lighting Tips Using Both Natural and Artificial Light
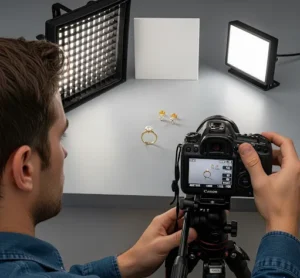
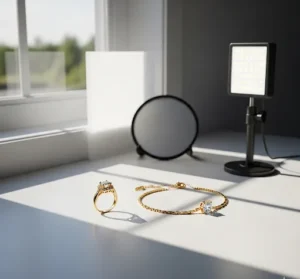 Using both natural and artificial light is one of the most important lighting tips for jewelry photography. Combining these light sources gives your photos a balanced and professional look. Natural light is soft and brings out true colors, while artificial light, like LED panels or small lamps, can fill in shadows and highlight details that natural light alone might miss. Following these lighting tips helps you control brightness, create depth, and make metals and gemstones shine. By applying these lighting tips, you can consistently improve the quality of your jewelry photos, if you’re using natural, artificial, or combined lighting. Combining these light sources lets you control brightness and direction, creating more depth and dimension in your images. It also helps maintain consistency when shooting indoors or on cloudy days. This approach is especially useful for showing off shiny metals, gemstones, or intricate textures.
Here are some tips to combine natural and artificial light effectively:
- Position your jewelry near a window to take advantage of soft daylight.
- Use a small LED light or lamp to fill in shadows without creating harsh spots.
- Adjust the intensity of artificial light so it matches the natural light’s tone.
- Experiment with angles to highlight the jewelry’s sparkle and texture.
- Consider using a diffuser or reflector to balance the light evenly.
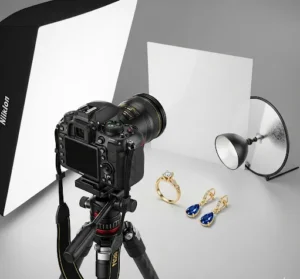
Position Your Light at the Right Angle
 The angle of your light can completely change how your jewelry looks in a photo. Light that hits the jewelry from the wrong direction can create harsh shadows, unwanted reflections, or areas that look flat. Positioning your light at the right angle helps highlight the details, sparkle, and texture of each piece. Usually, a light placed slightly above and to the side works well, but the best angle may vary depending on the shape and material of the jewelry. Experimenting with different positions allows you to see which angle makes the piece look its best.
Here are some tips for finding the right light angle:
- Take test shots and adjust until the jewelry’s shine and detail are clear.
- Move the light around the jewelry slowly and observe how shadows change.
- Try angles from above, the side, or slightly behind to improve depth.
- Use a reflector or white card to soften harsh shadows or bounce light into darker areas.
- Keep consistent angles when shooting multiple pieces to maintain a professional look.
Use Macro Lights for Small or Intricate Pieces
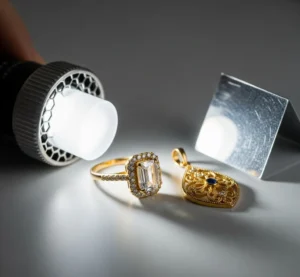 When photographing small or detailed jewelry, regular lighting might not show all the fine features. Macro lights are designed to focus on tiny areas, giving your images sharpness and clarity without harsh shadows. They help reveal intricate designs, delicate gemstones, and soft textures that can get lost in standard lighting. Using macro lights allows you to control brightness and direction very precisely, making your photos look more professional. This is especially helpful for rings, earrings, or pendants with tiny details that need to stand out.
Tips for using macro lights effectively:
- Experiment with brightness settings to get clear, natural-looking colors.
- Position the light close to the piece but avoid direct glare on reflective surfaces.
- Use diffusers to soften light and prevent harsh reflections.
- Try multiple angles to highlight all the intricate details.
- Combine with a tripod or stable surface to avoid blur in close-up shots.
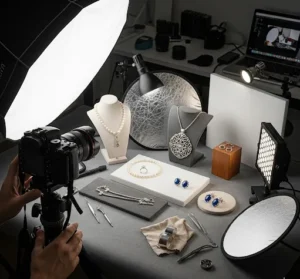
Choose the Right Equipment
 Having the right equipment can make a big difference in jewelry photography. A good camera, reliable tripod, and proper lighting setup help you take sharp, vibrant photos that show every detail. While high-end cameras are helpful, even a quality smartphone with the right settings can produce excellent results. Choosing lenses that allow close-up shots, like macro lenses, makes sure that small details are photographed clearly. Accessories like reflectors, diffusers, and lightboxes also help control shadows, reflections, and overall brightness.
Tips for selecting equipment:
- Use a tripod or stable surface to prevent blurry images.
- Invest in a macro lens for detailed close-ups of small pieces.
- Use LED lights or soft boxes for even, controllable lighting.
- Consider light diffusers or reflectors to reduce harsh shadows.
- Start with basic tools and upgrade as your photography skills improve.
Adjust Camera Settings for Better Lighting Tips
 Correct camera settings are important to make your jewelry photos look sharp and vibrant. Adjusting settings like aperture, shutter speed, and ISO helps control focus, brightness, and depth of field. A smaller aperture (higher f-number) keeps the entire piece in focus, which is ideal for detailed jewelry. Lower ISO values reduce grain or noise in the image, giving a cleaner look. Shutter speed should be fast enough to prevent blur, especially if you are shooting handheld. Even small tweaks can make a big difference in showing the jewelry’s color, shine, and texture accurately.
Tips for adjusting camera settings effectively:
- Take test shots and fine-tune settings before the final shoot.
- Use a smaller aperture (f/8–f/16) for sharper, detailed shots.
- Keep ISO low (100–200) for cleaner images without grain.
- Use a tripod for slower shutter speeds to avoid blur.
- Adjust white balance to match your lighting for true colors.
Focus on Details with a Macro Lens
 A macro lens is perfect for photographing jewelry because it lets you take even the tiniest details with clarity. Small gemstones, intricate engravings, and delicate textures can be lost with standard lenses, but a macro lens brings them into sharp focus. Using this lens allows you to get close without distortion, making every detail stand out. It’s especially helpful for rings, earrings, and pendants where precision matters. Pairing a macro lens with proper lighting make sure that your images are crisp, clear, and professional-looking.
Tips for using a macro lens effectively:
- Adjust aperture to control depth of field and keep the piece fully in focus.
- Keep the jewelry stable using a tripod or flat surface to avoid blur.
- Focus on the most important details, like gems or intricate designs.
- Use diffused lighting to prevent harsh reflections and shadows.
- Take multiple shots from slightly different distances to photograph the best angle.
Play with Shadows and Backlighting
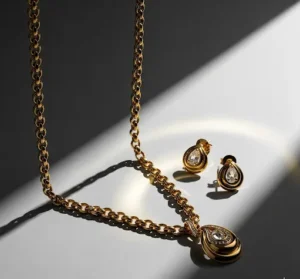 Shadows and backlighting can add depth and drama to jewelry photos, making them more visually interesting. By positioning a light source behind or to the side of the piece, you can create soft shadows that highlight textures and shapes. This technique can make metals shine and gemstones sparkle, adding a sense of dimension to flat-looking images. It also allows you to emphasize unique design features that might otherwise go unnoticed. Experimenting with different light positions helps you discover which angles best showcase each piece.
Tips for using shadows and backlighting effectively:
- Take test shots and adjust angles until the shadows improve the jewelry’s details.
- Place a light source behind the jewelry to create a glowing effect around edges.
- Use soft boxes or diffusers to prevent harsh, distracting shadows.
- Combine backlighting with a reflector in front to balance brightness.
- Try side lighting to emphasize texture and depth.
Take Advantage of Natural Light
Natural light is one of the easiest ways to make your jewelry photos look clear and true to color. Sunlight provides soft, even illumination that brings out the sparkle of gemstones and the shine of metals. Shooting near a window with indirect light works best because it reduces harsh shadows and glare. Natural light also helps show the jewelry’s details accurately without needing complicated equipment. By understanding how the sun changes throughout the day, you can choose the best time to shoot for consistent, high-quality photos.
Tips for using natural light effectively:
- Take multiple shots at different times of day to see which light works best.
- Shoot near a window with sheer curtains to soften direct sunlight.
- Avoid midday sun that can create strong shadows and glare.
- Use reflectors or white paper to fill in darker areas.
- Experiment with different angles to highlight shine and texture.
Keep Experimenting with Lighting Tips
 Jewelry photography is all about finding what works best for each piece, so don’t be afraid to try new techniques. Experimenting with different lighting, angles, backgrounds, and camera settings can reveal unique ways to make your jewelry stand out. Even small changes can make a big difference in how the details, colors, and shine appear. The more you practice, the better you’ll understand how light and composition affect your photos. Each piece may require a slightly different approach, so flexibility and creativity are key.
Tips for effective experimentation:
- Review your photos critically and make small adjustments for improvement.
- Try multiple angles and perspectives to find the most flattering view.
- Adjust lighting positions and intensity to see how shadows and highlights change.
- Test different backgrounds to complement the jewelry without distraction.
- Keep track of your settings for setups that work well.
Conclusion
Lighting can completely transform your jewelry photos, making even the smallest pieces look amazing and detailed. By trying different techniques, angles, and light sources, you can discover what works best for each piece. Remember, even small adjustments can create big improvements, so don’t be afraid to experiment. We’d love to hear from you; what lighting tips have worked for your jewelry photography? Or which techniques are you excited to try next? Share your experiences and questions in the comments below, and let’s inspire each other to take brighter, sharper, and more eye-catching photos.
Read Next: Best Cameras for E-Commerce Product Photography in 2026