6 Lighting Mistakes to Avoid in E-Commerce Photography
Lighting plays a big role in how product photos turn out, and even small errors can make your images look unprofessional. Many online sellers don’t realize that common lighting mistakes can affect how buyers see their products. Too much light can make photos look harsh, while too little light can make them appear dull and unclear. When lighting is not balanced, colors may look different from the actual product, which can cause customer disappointment. To avoid these problems, it’s important to know what to look out for when setting up your lights.
In e-commerce, product photos are often the first thing buyers notice, and poor lighting can easily turn them away. Clear, vibrant, and lighted images build trust and help products stand out in a crowded marketplace. Good lighting doesn’t always mean expensive equipment; it’s about using the right techniques and avoiding simple errors. By learning how to manage light properly, you can show your products in the best way possible. In this article, we’ll go through six common lighting mistakes and how you can prevent them to improve your product photography.
Lighting Mistakes You Make When Using Too Much Light
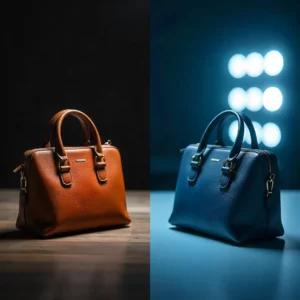 Too much lighting can make product photos appear overly lighted and unnatural. When the brightness is too strong, details of the product like texture, color, or small features tend to get lost. This can mislead buyers, as the actual product may look different in person compared to the photo. Overexposure also creates an uncomfortable glare that distracts the eye instead of showing the product clearly. The goal is to keep the product looking true to life while still standing out.
To avoid using too much light, it’s important to find a balance that highlights the product without washing it out. You don’t need expensive tools to control brightness; simple adjustments can go a long way. Try these tips:
- Use diffusers like white cloth, paper, or soft boxes to soften strong lights.
- Position lights at an angle instead of directly on the product.
- Check the photo on your camera or computer screen to make sure it looks natural.
- Lower the intensity of artificial lights if they are too harsh.
Taking Photos That Are Too Dark
 Taking photos that are too dark is a common problem, especially in low-light settings or indoor spaces. When your images are too dark, important details can be lost, and the overall quality may look unprofessional. This often happens when the camera’s exposure settings are too low or when there isn’t enough natural or artificial light. Dark photos can also make colors look dull and reduce the sharpness of the image. Fortunately, small adjustments can make a big difference, and understanding how to manage light is key to better photography.
To avoid overly dark photos, try to increase the available light or adjust your camera settings. Using a higher ISO can make the sensor more sensitive to light, but be careful as it can also add grain. Opening the aperture wider lets more light into the camera, and slowing down the shutter speed can help in darker environments. You can also use external lights or reflectors to brighten shadows. Editing software can help correct dark images, but it’s always better to get the lighting right when taking the photo.
Tips to prevent dark photos:
- Shoot near windows or in light areas whenever possible.
- Use a tripod if slowing the shutter speed to prevent blurry images.
- Adjust the camera’s ISO, aperture, and shutter speed for the scene.
- Add extra light sources like lamps or portable LED lights.
- Check your camera’s histogram to see if your photo is underexposed.
Lighting Mistakes That Create Harsh and Distracting Shadows
 Creating harsh and distracting shadows can make your photos look unbalanced and take attention away from the main subject. Shadows that are too strong often appear when the light source is too direct or positioned at the wrong angle. This can happen outdoors on vibrant sunny days or indoors with a single, strong light. Harsh shadows can make your subject’s features look uneven or create unwanted dark areas in the background. Understanding how light interacts with your subject is important to keep your photos clean and professional.
To reduce harsh shadows, consider using softer or diffused light. Reflectors or white boards can bounce light into shadowed areas, creating a more even look. Moving your light source further away or changing its angle can also help. Natural light during early morning or late afternoon tends to be softer and more flattering. You can also experiment with multiple light sources to fill in shadows without flattening the image.
Tips to avoid harsh shadows:
- Use soft boxes or diffusers with artificial lights.
- Position your subject so that light falls evenly on them.
- Bounce light with reflectors to fill dark areas.
- Avoid shooting under direct midday sun when outdoors.
- Adjust angles and distances of lights to control shadow intensity.
Mixing Different Light Sources
 Mixing different light sources can create problems in your photos, especially if the lights have different colors or intensities. For example, combining sunlight with indoor lights can make your images look unnatural, with parts of the photo appearing too warm or too cool. This happens because cameras can struggle to balance the color temperature from multiple sources. Mixed lighting can also create uneven shadows and highlights, making your subject look less appealing. Understanding the type of light, you are using is key to keeping your photos consistent and professional.
To manage mixed lighting, try to use one main light source whenever possible. If you need multiple lights, make sure they have similar color temperatures. You can also adjust your camera’s white balance to match the dominant light. Reflectors or diffusers can help balance light from different directions. Editing software can correct minor color differences, but it’s better to control lighting during the shoot.
Tips to handle mixed lighting:
- Use lights with the same color temperature (e.g., all daylight or all tungsten).
- Adjust your camera’s white balance for the main light source.
- Use reflectors to fill uneven lighting.
- Avoid combining strong natural light with vibrant artificial lights.
- Test shots before the final photo to check color consistency.
Lighting Mistakes That Cause Uneven Lighting Across the Photo
 Uneven lighting across a photo can make some areas too vibrant while others appear too dark, distracting the viewer from the main subject. This often happens when the light source is too directional or when multiple lights are not balanced properly. Uneven light can also create unwanted shadows, highlights, or color differences, which make the photo look unprofessional. It is especially noticeable in portraits or product photos where consistent lighting is important. Paying attention to how light spreads across your scene helps maintain a clean and polished look.
To fix uneven lighting, try using soft or diffused light to cover the entire scene evenly. Reflectors can bounce light into darker areas, reducing harsh contrasts. Adjusting the position or intensity of your lights can also balance the brightness. Natural light works best when it spreads evenly, like on cloudy days or near large windows. Minor adjustments in editing software can help, but the best results come from controlling light during the shoot.
Tips to prevent uneven lighting:
- Use diffusers or soft boxes to spread light evenly.
- Position lights at angles that reduce shadows.
- Use reflectors to fill dark spots.
- Avoid strong direct light that creates vibrant and dark patches.
- Check the histogram to see if parts of your photo are overexposed or underexposed.
Ignoring the Power of Natural Light
 Ignoring the power of natural light can limit the quality and appeal of your photos. Natural light is soft, even, and flattering, and it can help highlight your subject in ways artificial lights sometimes cannot. Shooting without considering natural light may result in dull or flat images, harsh shadows, or uneven colors. Many photographers overlook the best times of day to use sunlight, which can improve the mood and clarity of a photo. Understanding how natural light interacts with your subject allows you to take more professional-looking pictures with minimal equipment.
To take full advantage of natural light, pay attention to the time of day and the direction of sunlight. Early morning and late afternoon, also called the golden hours, provide soft and warm light that works well for portraits and landscapes. Position your subject so that light falls evenly, avoiding unwanted shadows. Reflectors or white surfaces can help bounce natural light into darker areas. While editing can fix small lighting issues, using natural light during the shoot gives the best results.
Tips to use natural light effectively:
- Shoot during golden hours for softer and warmer light.
- Place subjects near windows or open spaces for even lighting.
- Use reflectors to fill in shadows naturally.
- Avoid direct overhead sunlight that creates harsh shadows.
- Observe how light changes throughout the day and adjust your shoot accordingly.
Conclusion
Lighting mistakes can make or break your e-commerce photos, even if your products are high-quality. By avoiding common errors like too much light, harsh shadows, or uneven brightness, you can make your products look clear, professional, and appealing to buyers. Using natural light wisely and balancing artificial sources helps show your items in the best way possible. Remember, small adjustments during the shoot often save more time than fixing problems in editing later. Have you faced any lighting challenges while taking product photos? Share your experiences or tips in the comments below and let’s help each other improve our e-commerce photography.
Read Next: 10 Affordable Tools for Beginners to Get Started in Photography