

7 Types of Product Shots Every Online Store Needs
When it comes to selling online, product shots are more than just pictures; they are your store’s first impression. High-quality product shots help customers see exactly what they are buying and make your products look trustworthy and professional. Different types of shots can highlight details, show scale, or display products in use. Without the right images, even the best products may struggle to catch attention. Understanding the types of product shots you need can make your online store stand out and encourage shoppers to click “buy.”
Not all product shots are the same, and each serves a different purpose. Some shots focus on close-up details, while others show the full product or how it’s used in real life. Using a variety of images can answer customers’ questions before they even ask. This approach reduces doubts and increases the chances of making a sale. In this guide, we’ll explore seven important types of product shots every online store should have to create clear, appealing, and effective product listings.
Product Shots That Show the Item Fully
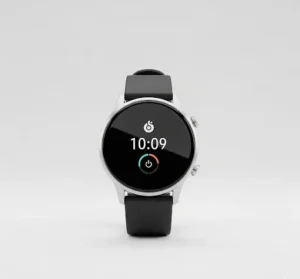 Full product shots are the foundation of any online store’s image gallery. They give customers a complete view of the item, showing its shape, size, and overall appearance. Without a clear full shot, buyers may feel unsure about the product, which can lead to abandoned carts or lost sales. These images should be lighted, sharp, and taken from a straight-on perspective to make the product easy to see. Keeping the background simple helps the item stand out and prevents distractions. A well-presented full shot builds trust and makes the product feel more professional.
When taking full product shots, consider consistency across all items in your store. Using the same angle, distance, and lighting for every product creates a clean, uniform look that is visually appealing. It also helps customers compare products easily. Simple adjustments during editing, like aligning the item in the center and correcting exposure, can make a big difference.
Tips for creating effective full product shots:
- Use a plain, neutral background to highlight the product.
- Make sure the entire product fits in the frame.
- Keep the camera level with the product for a straight perspective.
- Make good lighting to avoid shadows and dark areas.
- Use a tripod or stable surface to prevent blurry images.
Close-Up Shots for Important Details
 Close-up shots focus on the finer details of a product that customers might miss in full shots. These images help show textures, patterns, materials, and unique features, giving buyers a better sense of quality and craftsmanship. Without close-ups, some important selling points may go unnoticed, making products feel less appealing. Close-up shots also help answer questions customers often have before buying, reducing hesitation and returns. Clear, lighted close-ups can highlight what makes your product special and set it apart from competitors.
When taking close-ups, pay attention to focus and lighting to bring out every detail. Use a macro lens or the zoom function on your camera to get sharp, detailed shots. Make sure the background remains simple so the product feature stands out. Editing can improve clarity, but avoid overdoing it, as too much contrast or sharpening can look unnatural.
Tips for effective close-up shots:
- Focus on one key feature at a time.
- Use soft, even lighting to highlight textures and details.
- Keep the background neutral to avoid distractions.
- Use a steady camera or tripod for sharp images.
- Take multiple shots from slightly different angles to find the best view.
Lifestyle Product Shots for Real Use
 Lifestyle product shots show your items being used in real-life situations. These images help customers imagine how the product fits into their daily life or environment, making it easier to connect with the item. Rather than just showing the product alone, lifestyle shots create a story that makes the product feel practical and relatable. They are especially useful for items like clothing, home goods, or accessories where context matters. A well-planned lifestyle shot can boost buyer confidence and encourage them to make a purchase.
When taking lifestyle shots, think about the scene, props, and people that will make the image feel natural. The product should be the focus, but the setting should improve its appeal. Keep lighting consistent and avoid cluttered backgrounds that distract from the item. Editing can adjust brightness and colors, but maintain a realistic feel so the product looks genuine.
Tips for creating effective lifestyle shots:
- Place the product in a real-life setting that matches its use.
- Include models or hands to show scale and interaction.
- Use props sparingly to improve the scene without stealing focus.
- Keep lighting soft and natural for a realistic look.
- Photograph multiple angles to show different perspectives of the product.
Shots From Different Angles
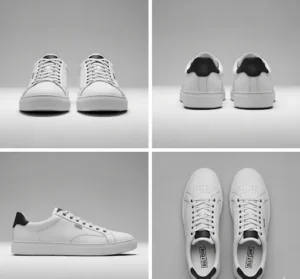 Showing a product from multiple angles helps customers get a complete understanding of what they are buying. Different views can reveal shapes, features, and details that a single shot might miss. For example, side, back, and top views can clarify the product’s design and build, reducing questions and uncertainty. Angle shots also make your listings look more professional and thorough, giving buyers confidence in your store. By giving a full perspective, you make it easier for customers to compare products and decide on a purchase.
When taking shots from different angles, keep the product centered and maintain consistent lighting across all images. Avoid angles that distort the product or hide important details. Using a tripod or stable surface helps keep the shots sharp and aligned. Editing can improve clarity and balance, but the product should always look natural.
Tips for taking multiple angles:
- Take front, back, side, and top views of the product.
- Keep the camera level and consistent for all angles.
- Make sure good lighting to show details clearly.
- Use a plain background to maintain focus on the product.
- Review shots at full size to confirm clarity and accuracy.
Scale Shots to Show Size
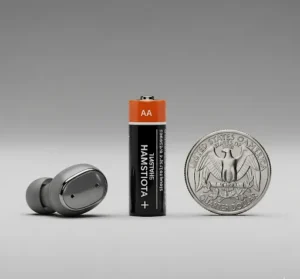 Scale shots help customers understand the actual size of a product. Online shoppers can’t hold or touch items, so showing scale prevents confusion and reduces returns. Including familiar objects like a hand, coin, or everyday item gives viewers a clear reference. These shots are especially important for clothing, accessories, gadgets, and home goods where size matters. A well-planned scale shot gives buyers confidence that the product matches their expectations.
When creating scale shots, make sure the reference object is clearly visible and proportionate to the product. Keep lighting even and consistent with other images in your gallery. Avoid cluttered backgrounds that distract from the product and its size. Editing can boost clarity, but the focus should remain on showing accurate dimensions.
Tips for effective scale shots:
- Use common items like hands, cups, or rulers for reference.
- Keep the product centered and fully visible.
- Maintain consistent lighting with other product images.
- Avoid props that confuse the size perception.
- Photograph multiple angles if necessary to show true proportions.
Styled Shots That Look Attractive
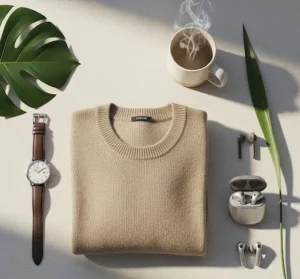 Styled shots present your products in a visually appealing way by adding props, backgrounds, or arrangements that complement the item. These images make your store look professional and can draw attention to features that might be missed in plain shots. While style matters, the product should always remain the main focus. Well-composed styled shots can also create a mood or lifestyle feeling that resonates with customers and encourages them to buy.
When creating styled shots, choose props and backgrounds that improve the product without overpowering it. Keep colors and textures harmonious, and make the lighting highlights the product naturally. Avoid clutter or overly complicated setups that distract from the item. Editing can adjust brightness, contrast, or color balance, but the styling should look authentic.
Tips for effective styled shots:
- Use simple props that complement the product.
- Keep the product as the main focus in the frame.
- Choose backgrounds and colors that improve, not distract.
- Maintain consistent lighting for a professional look.
- Experiment with different arrangements to find the most appealing composition.
Comparison Product Shots for Options
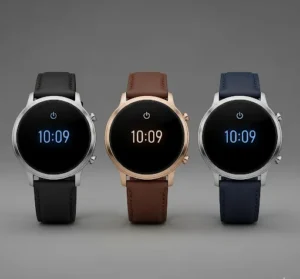 Comparison shots help customers see the differences between product variations, such as colors, sizes, or styles. These images make it easier for buyers to choose the right option without confusion. By displaying multiple versions side by side, you reduce questions and potential returns, while giving shoppers confidence in their decision. Comparison shots are especially useful for clothing, accessories, or products that come in sets or bundles. Clear, well-organized comparison images make your listings more professional and user-friendly.
When creating comparison shots, keep the items aligned and use consistent lighting to assure fairness and clarity. Make sure each product is fully visible and easy to distinguish. Editing can improve brightness and color accuracy, but the goal is to show true differences between options. Simple, neat layouts are more effective than crowded or messy arrangements.
Tips for effective comparison shots:
- Place products side by side for easy visual comparison.
- Use consistent angles and lighting for all items.
- Keep backgrounds simple to avoid distractions.
- Label or highlight differences if necessary for clarity.
- Make sure that colors and details are accurate to help buyers choose confidently.
Conclusion
Using the right product shots can make a big difference in how customers see your online store. Each type of shot, from full views to close-ups, lifestyle images, and comparisons; helps shoppers understand, trust, and connect with your products. A variety of images answers questions before they are asked and reduces hesitation, which can boost sales. Taking the time to plan, shoot, and edit carefully shows your products at their best and makes your listings look professional. We’d love to hear from you, what types of product shots have worked well for your store, or which ones do you plan to try? Share your thoughts and experiences in the comments below and join the conversation.
Read Next: Creative Jewelry Photography Ideas for Unique Shots


