Attractive Product Shots That Help Your Brand Stand Out
Attractive product shots matter more now because people often choose what to buy based on how a product looks in a photo. If your picture doesn’t grab their attention, they’ll likely scroll past it. Even if your product is high quality, a blurry or messy photo can push people away. On the other hand, a clean and well-prepared image can make someone pause and think, “This looks nice.” That kind of reaction can help your product stand out online.
The best part? You don’t need to be a professional to take good photos. A plain background, natural light, and a little effort can already make a big difference. Just stick to the basics. Place your product in the middle, make sure the photo is clear, and take out anything that doesn’t belong in the shot. These small things help your product stand out and make your brand easier to remember. Let’s go over how you can do this, even with a simple setup.
Here are some Guide to Create Attractive Product Shots
Set Up Your Space for Attractive Product Shots
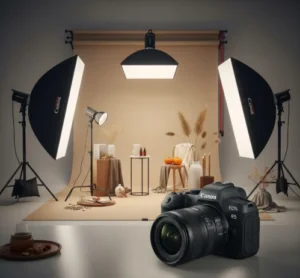 Before you start taking product photos, it’s important to set up your space properly. A clean and organized area helps you focus and makes your product look better in pictures. To get eye-catching product shots, use a neat background and good lighting, they can make a big difference. Natural light from a window works great, but you can also use a lamp or light to brighten up the space. Always check what’s in the frame behind your product. Keep it plain and free from clutter. Your setup should match the feel of your product, make it simple, modern, fun, or cozy.
To help you get your photo space ready, here are some easy tips:
- Turn off anything that might cast moving shadows, like fans or blinking lights
- Use a tripod or place your phone on a steady surface to avoid blurry shots
- Take a few test photos to check lighting and background before the real shoot
- Keep tools like props, cloth wipes, or extra items close so you don’t waste time
- A plain wall, wooden table, or soft cloth backdrop can make your product stand out without being distracted.
Product Photography Lighting Tips for Standout Photos
Lighting plays a big role in how your product photos turn out. Good lighting helps you take eye-catching shots that look sharp and clear, even if you’re just using a phone. One simple lighting setup you can try is called three-point lighting. It uses one light to brighten the product, another to soften shadows, and a third behind it to add depth to the photo.
You don’t need fancy lights to do this; even basic desk lamps or natural light from a window can work well. Just make sure the strongest light is in front of your product, not behind it, to avoid unwanted shadows.
Here are some simple tips to improve lighting for your product photos:
- Place your product near a window for soft, even light
- Avoid overhead lighting that casts dark shadows on your product
- Use white cloth or paper to soften harsh light and spread it evenly
- Try to use lights with the same color tone to avoid unwanted tints in your photo
- Take a few test shots to see how the lighting looks before shooting the rest
Use Framing and Angles for Professional-Looking Product Shots
 These are important parts of taking product photos that look clean and attractive. Framing is how you position the product in the shot, while angles are about where you place your camera or phone. Good framing helps focus attention on your product and avoids things in the background that can distract the viewer. A simple trick is the rule of thirds. imagine your photo is divided into nine parts using two horizontal and two vertical lines. Try placing your product along these lines or where they meet to create a more balanced and natural-looking photo.
Angles can also make a big difference to how your product looks. Shooting from eye level often gives a natural feel, but different angles can highlight unique features or add more style. A slightly higher angle can show more of the top and shape of your product, while a lower one can make it look more bold or strong. Try a few different angles to see what works best for your item. Using a mix of angles in your photos also keeps your product page or social media post more interesting.
Here are some helpful tips:
- Use a tripod or steady surface to avoid blurry shots
- Check the background and remove anything that looks messy or out of place
- Leave enough space around the product so it doesn’t look too crowded
- Don’t overdo angles, too many extreme views can be confusing
- Take a few test shots to see how the photo looks before taking more
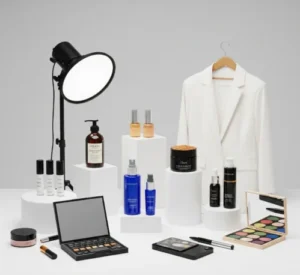
Create Attractive Product Shots Using Props and Clean Backgrounds
 Adding props and backgrounds is one of the simplest ways to make your product photos look more appealing. Props can help tell a story, set the mood, or show how the product is used in everyday life. You don’t need a lot, just a few well-chosen items that support the product without stealing the spotlight. For example, if you’re photographing a coffee mug, you could place a book or a cookie nearby to create a cozy feel. Backgrounds matter just as much. A clean, non-distracting backdrop keeps the focus on your product while still helping you create a nice setup.
Here are some tips for choosing and using props and backgrounds effectively:
- Use props that relate to the product or its purpose.
- Stick to plain or soft-colored backgrounds to avoid distractions.
- Don’t overcrowd the scene, leave some space around your product.
- Try using a curtain, paper roll, or wall as a simple backdrop.
- Place props at different angles or distances to add some depth.
Post-Processing Tips to Polish Your Eye-Catching Product Shots
Attractive product shots often rely on good post-processing, which is the step where you edit your photos after taking them. It helps clean up your images, fix minor issues, and make your product look its best. You don’t need to overdo it, just a few small changes can make your photos more professional and easier to view. Many free and paid apps are available for photo editing, like Lightroom, Snapseed, or Canva. The goal is to improve your image without making it look fake or misleading.
Start by fixing basic things like brightness, contrast, and color balance. Make sure the product looks as close to real life as possible. You can also crop the image to remove distractions around the edges and help focus on the product. Sharpening the image slightly can also bring out details without making it look too harsh. Try to keep everything simple and clean so your product stands out.
Here are a few helpful post-processing tips:
- Adjust lighting and shadows to make the product look clear.
- Crop and straighten the photo to keep things neat.
- Use simple filters or presets to save time but avoid overediting.
- Remove dust or spots using a healing or clone tool.
- Check your final photo on both desktop and mobile screens before posting.
Attractive Product Shots in E-Commerce Preparation
Attractive product shots are also important when starting an e-commerce business, it takes more than just having a product to sell. You need to build a solid plan, understand your target market, and choose the right platform for your store. Before doing anything else, ask yourself what problem your product solves and who will benefit from it. Knowing your audience helps guide your marketing, pricing, and overall presentation. It’s also a good idea to study your competitors to see what works and how you can stand out.
Once your product and target market are clear, the next step is to prepare your store. This means writing simple product descriptions, using good photos, and keeping your website or shop easy to use. People should be able to find what they need without getting confused. You’ll also need to set up payment options, shipping methods, and customer service plans. A smooth shopping experience builds trust and encourages repeat buyers.
Here are some helpful tips when preparing for e-commerce:
- Use high-quality product images with clean backgrounds.
- Write short but clear product descriptions with key details.
- Offer secure and flexible payment methods.
- Make sure your website works well on both desktop and mobile.
- Set up automatic email replies or a chatbox to help customers quickly.
Conclusion
Creating attractive product photos doesn’t have to be complicated. With some planning, good lighting, and simple touches like props and clean backgrounds, your photos can stand out and catch attention. Even if you’re only using a smartphone, you can still get great results by keeping things simple and focusing on the basics. A clear photo that shows your product well can go a long way in building trust and making your brand memorable. Good pictures don’t just show your product; they help tell its story.
Now it’s your turn. Have you tried any of these tips before? What worked best for you, or what challenges did you run into while taking product shots? Share your thoughts, questions, or even your favorite photo-editing app in the comments below. Let’s help each other grow by swapping ideas and experiences. We’d love to hear what you think.
Read Next: 10 Best Photo Editing Blogs and Websites in 2025