
Headshot Photography Tips for Everyone
Getting great headshot photography doesn’t require a high-end studio or years of training. Whether you are updating a professional profile or a company website, a few simple adjustments to your environment and pose can make a significant difference.
Here are practical ways to improve your headshot photography results today
Find the Best Headshot Light
Good lighting is the foundation of any clear image. Instead of using a camera flash, which often creates harsh shadows and oily skin textures, looks for soft, natural light. Stand near a large window but stay out of direct sun to avoid squinting. If you are outdoors, a shaded area or an overcast day provides the most even coverage for your face.
Focus on Headshot Photography Angles and Poses
How you position your body changes the mood of the photo. Avoid standing flat against a wall. Instead, turn your shoulders at a slight angle away from the lens while keeping your face toward the camera. This creates a more natural appearance. Leaning slightly forward can also help define your jawline and make the shot feel more engaging.

Choose Your Headshot Wardrobe
Your clothing should support your face, not distract yourself from it. Solid colors typically work better than busy patterns or large logos. Pick a top that fits well and makes you feel confident. Since most profile pictures are cropped tightly, pay the most attention to the neckline and how the fabric sits on your shoulders.
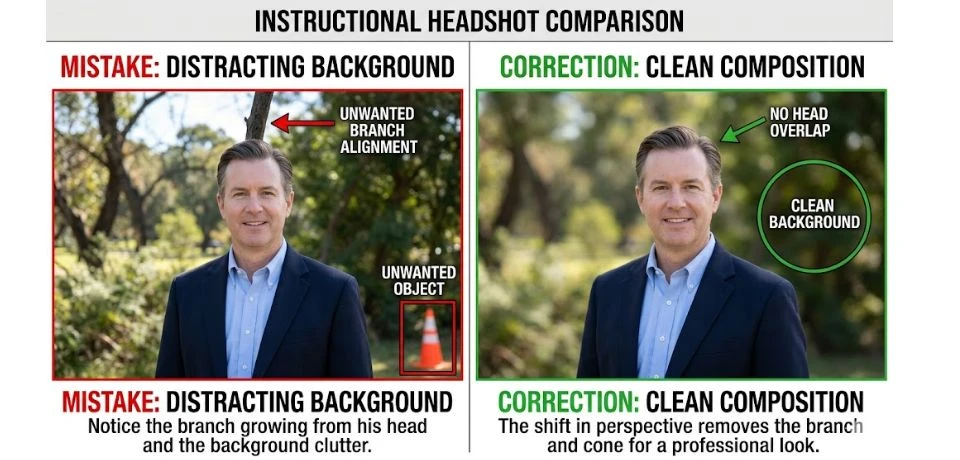
Prepare Your Headshot Photography Background
A cluttered background pulls attention away from you. Aim for a simple, clean space. A neutral wall, a quiet office corner, or a blurred outdoor garden are all excellent choices. Make sure there are no distracting objects, like plants or poles, appearing to grow out of the top of your head.

Conclusion
Professional headshots depend more on preparation than expensive equipment. To get the best results, prioritize soft, natural light from a window or a shaded outdoor spot to avoid harsh shadows. When posing, angle your shoulders slightly and lean forward to create a natural, engaging look. Choose solid colors for your clothing to keep the focus on your face, and ensure your background is clean and free of distractions.
The goal of a headshot is clarity and approachability. By managing your environment specifically, the light and the backdrop ensure that your personality remains the focal point, making a strong first impression without needing a studio.
Grab your camera and test these lighting and posing tips today to see an immediate difference in your profile photo.
Read Next: Corporate Headshot Shoot Important Tips and Guide