Lighting Modifiers You Can Use for Every Photo Shoot
Lighting can make or break a photo, and that’s where lighting modifiers come in. These handy tools help you control how light hits your subject, making it softer, lighter, or more focused. Even if you’re shooting portraits, products, or events, using the right lighting modifier can instantly improve your results. You don’t need fancy gear, just the right tools and a bit of practice. From beginners to pros, anyone can use lighting modifiers to bring their creative ideas to life.
In this guide, we’ll explore the best lighting modifiers you can use for every photo shoot. We’ll keep it simple so you can understand what each one does and when to use it. You’ll learn how to shape light, reduce harsh shadows, and highlight your subject with ease. These tools aren’t just for studios, they’re great for outdoor shoots too. Ready to take your lighting game to the next level? Let’s dive in.
Why Lighting Modifiers Matter
 Lighting modifiers matter because they help you control how light behaves in your photos. Natural or artificial light on its own can be too harsh, too soft, or simply not going in the right direction. Modifiers like soft boxes, reflectors, and diffusers let you shape light to match your vision. They help reduce unwanted shadows, highlight your subject’s best features, and add mood or drama when needed. Without modifiers, you might struggle with overexposed spots, flat lighting, or messy backgrounds. Using them is a simple way to instantly improve the quality and feel of your images.
If you’re shooting indoors or outdoors, lighting modifiers give you flexibility and creative control. You don’t always need expensive gear; even small tools can make a big difference. With a little practice, you’ll learn how to use modifiers to create attractive photos in any situation. Here are a few tips to keep in mind when using lighting modifiers:
- Use a softbox for smooth, even light, great for portraits and product shots.
- Try a reflector to bounce light onto darker areas and fill shadows.
- Use a diffuser to soften strong sunlight or harsh flash.
- Experiment with angles to see how light changes the mood.
- Keep your setup simple, even one modifier can make a big impact.
Different Lighting Modifiers
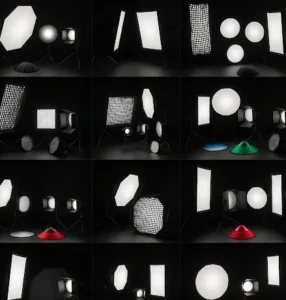
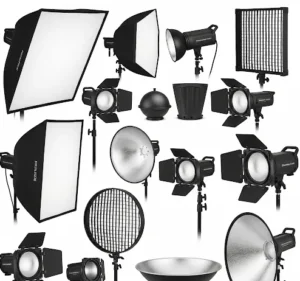 There are many different lighting modifiers, and each one has a unique purpose in shaping light. Some spread light evenly for soft, natural results, while others focus or block light to create contrast and drama. Common types include soft boxes, umbrellas, reflectors, diffusers, snoots, and grids. Soft boxes and umbrellas are great for softening light, making them ideal for portraits. Reflectors and diffusers are lightweight and easy to use, perfect for outdoor shoots. Snoots and grids, on the other hand, direct light to a specific spot, which is useful for detail shots or creative effects.
Knowing when and how to use each modifier can greatly improve your photos. It’s all about choosing the right tool based on your subject, setting, and style. If you’re just starting out, focus on a few basic modifiers and learn how they change your lighting. Once you’re comfortable, you can explore more advanced tools. Here are some simple suggestions to help you get started:
- Use umbrellas for quick setups with soft, wide lighting.
- Try a softbox when you want more control and less light spill.
- Keep a reflector handy to soften shadows or balance light.
- Use grids or snoots to highlight specific parts of your subject.
- Practice in different settings to understand how each modifier works best.
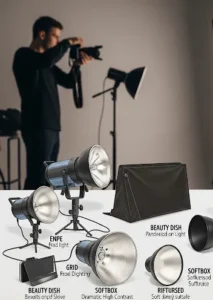
Must-Have Lighting Modifiers for Any Shoot
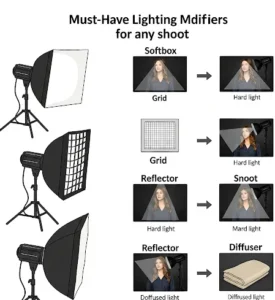 No matter what kind of photography you do, there are a few must-have lighting modifiers that can help you get better results. These tools are popular because they’re simple, versatile, and work well in many types of shoots. A softbox is a favorite for many photographers because it softens harsh light and gives a clean, professional look, perfect for portraits, products, and studio work. Reflectors are another important item that can bounce light back onto your subject and reduce shadows, especially helpful for outdoor or natural light settings. Umbrellas are affordable, easy to set up, and can spread light over a wide area, which is great for group shots or softer lighting needs.
As you grow more comfortable with basic modifiers, it’s worth adding a few more tools to your kit. Diffusers help control sunlight or flash and are useful in both indoor and outdoor setups. For more creative lighting, grids and snoots help you direct light to specific parts of your subject, adding focus or drama. Having these modifiers ready means you’re prepared for almost any lighting challenge. Here are some helpful tips for choosing and using them:
- Start with a softbox for soft, flattering light in portraits.
- Use a 5-in-1 reflector to get multiple light effects in one tool.
- Pick a white umbrella for soft, wide light and a silver one for more contrast.
- Use a diffuser when working in harsh sunlight or with a strong flash.
- Keep grids or snoots for times when you need focused, dramatic lighting.
Choosing the Right Modifier for Your Style
 Choosing the right lighting modifier depends on your photography style and the mood you want to create. For example, if you love shooting soft, dreamy portraits, a softbox or umbrella can help spread light evenly and reduce harsh shadows. On the other hand, if you enjoy dramatic or moody images, using a grid or snoot can help you focus the light and add contrast. Think about what feeling you want the photo to have, clear and natural, or bold and artistic. Every modifier gives you a different effect, so choosing the right one will help bring your creative vision to life. Your subject also plays a big role in choosing a modifier. A reflector might be enough for natural light portraits, while a diffuser can help tame harsh sunlight during outdoor shoots.
For product photography, you’ll want more control, so a softbox or even multiple modifiers may be needed. Try experimenting with different tools to see how they change your results.
Here are a few quick tips to guide your choice:
- Use a softbox or umbrella for soft, flattering light on faces.
- Try grids or snoots for dramatic, focused lighting in creative work.
- Go for reflectors when you need a simple, portable light fix.
- Use diffusers to soften strong light outdoors.
- Match the modifier to the mood or tone you want in your photos.
Simple Setups for Great Results
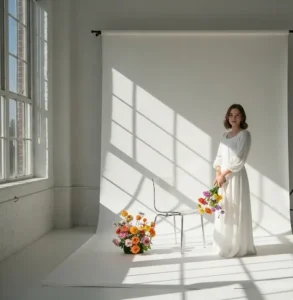 You don’t need a full studio or expensive gear to get great lighting; simple setups can deliver amazing results. One good light source and the right modifier can go a long way. For example, placing a softbox at a 45-degree angle to your subject creates soft shadows and a natural look. If you’re outdoors, using a reflector to bounce sunlight can light the face and reduce shadows. A diffuser can also help when the sun is too strong, creating smooth, even light. Keeping things simple lets you focus more on your subject and less on technical setups.
These basic setups work well for portraits, products, and even candid shots. You can build on them later as you learn more and want to try creative effects. The goal is to understand how light works and use it to your advantage. Even a small change in light position or modifier type can make a big difference. Here are a few tips to get started with easy and effective setups:
- Use one light and a softbox for clean, soft lighting.
- Bounce natural light with a reflector for outdoor portraits.
- Try a white wall as a background to reflect and soften light.
- Use window light with a sheer curtain as a built-in diffuser.
- Start simple, then add more modifiers as you gain experience.
Conclusion
Lighting modifiers are strong tools that can turn an ordinary photo into something truly eye-catching. No matter if you’re just starting out or have years of experience, using the right modifier can help you take control of your light and create the style you want. The good news is you don’t need expensive gear to make a big difference. With a few key tools and some practice, your lighting setups can look clean, professional, and creative. So, what’s your favorite lighting modifier or go-to setup? Share your tips or questions in the comments, we’d love to hear how you use lighting to bring your photos to life.
Read Next: Best Poses and Angles for Lifestyle E-Commerce Photography