Top 10 Real-Life Examples of AI vs. Manual Photo Editing Results
When it comes to photo editing, the debate between AI vs. Manual Photo methods has become more important than ever. AI-powered editing and manual editing by skilled professionals both have their strengths, but the results can look very different. AI editing is fast and can handle large batches of photos quickly, while manual editing allows for more precise control and creative touches. For anyone curious about how these two approaches compare, seeing real examples can be very eye-opening.
In this article, we’ve gathered the top 10 real-life examples of AI vs. manual photo editing outcomes. You’ll see how AI handles colors, lighting, and basic corrections versus how a human editor adjusts details, textures, and small imperfections. By exploring these examples, you can better understand which approach suits your needs. If you’re a photographer, designer, or just someone curious about photo editing, this comparison will help you see the real differences in results, quality, and style.
Color Correction Comparison AI vs. Manual Photo
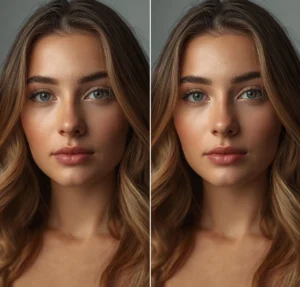 Color correction is one of the most noticeable differences between AI and manual photo editing. AI tools can quickly adjust brightness, contrast, and colors across multiple photos in just a few clicks. This makes it ideal for large batches or when you need fast results. Manual editing, on the other hand, allows a human editor to fine-tune every detail, making that the colors look natural and match the intended mood of the photo. While AI may sometimes overcorrect or miss simple tones, manual adjustments can preserve the depth and richness of colors.
Tips for better color correction:
- Check the white balance first to make sure that colors are accurate.
- Use AI for quick adjustments but review results for unnatural tones.
- Manually tweak saturation and contrast for specific areas that need attention.
- Compare before and after images to see if the changes improve the overall look.
Skin Retouching Techniques That Stand Out
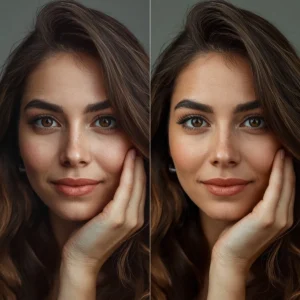
Skin retouching is a key part of making portraits look polished and professional. AI tools can quickly smooth skin, remove blemishes, and even adjust tone across the entire face, saving time for large batches of photos. However, AI may sometimes create an overly smooth or unnatural look, losing the person’s unique features. Manual retouching allows editors to work carefully on small areas, keeping skin texture while correcting imperfections. This approach gives a more natural and realistic result, especially for high-end portraits. Choosing the right method depends on the balance you want between speed and authenticity.
Tips for effective skin retouching:
- Start with a clean, high-resolution image for the best results.
- Use AI for basic smoothing, then refine manually for natural texture.
- Avoid over-smoothing to keep pores and natural lines visible.
- Focus on problem areas first, like blemishes or uneven tone, before adjusting the whole face.
Perfecting Backgrounds Like a Pro
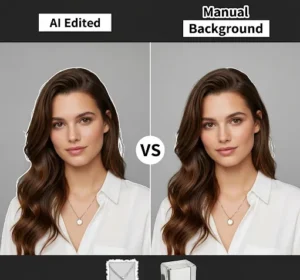 Backgrounds can make or break a photo, and editing them properly helps the main subject stand out. AI tools are great for quickly removing or replacing backgrounds, especially for simple shapes or plain backgrounds. However, AI can struggle with fine details like hair, jewelry, or transparent objects, sometimes leaving edges looking rough. Manual editing gives editors full control to clean up edges, smooth transitions, and make the background complements the subject naturally. This method may take more time but produces professional-looking results that feel seamless. Choosing the right approach depends on the speed or precision is more important for your project.
Tips for perfect backgrounds:
- Zoom in and check edges for any leftover traces or rough areas.
- Use AI to remove simple backgrounds, then refine manually for complex details.
- Match background colors and lighting to the subject for a natural look.
- Keep shadows and reflections consistent to maintain realism.
Lighting and Exposure Made Simple AI vs. Manual Photo
Lighting and exposure are important in making a photo look balanced and appealing. AI tools can quickly adjust brightness, contrast, and shadows across an image, making underexposed or overexposed photos look better in seconds. While AI works fast, it may sometimes overcorrect, causing areas to look unnatural or washed out. Manual editing allows precise control over highlights, shadows, and mid tones, giving a more realistic and polished result. This approach is especially useful for portraits, landscapes, or product photos where lighting details matter. Choosing between AI and manual methods depends on the speed or accuracy is your priority.
Tips for better lighting and exposure:
- Start by analyzing the original image to see which areas need adjustment.
- Use AI for a quick overall fix, then fine-tune manually for specific areas.
- Adjust highlights and shadows separately to maintain depth.
- Compare before and after edits to create natural-looking results.
Improving Textures for Realistic Results
 Improving textures can bring photos to life by adding depth and detail to surfaces, skin, fabrics, or objects. AI tools can quickly sharpen textures or emphasize patterns, which works well for general improvements and batch editing. However, AI may sometimes overdo it, creating an unnatural or overly sharp look. Manual editing allows careful retouching of specific areas, preserving natural textures while improving clarity and depth. This method is ideal for high-end portraits, product shots, or any image where realistic detail matters. Choosing the right approach depends on the balance between speed and fine-tuned quality.
Tips for improving textures effectively:
- Focus on areas that need emphasis, like fabric details, skin features, or jewelry facets.
- Use AI for initial sharpening, then refine manually to avoid over-improvement.
- Compare the edited image with the original to maintain a natural look.
- Pay attention to lighting and contrast, as they can affect how textures appear.
- Make sure that colors match the real item to avoid misleading buyers.
Jewelry and Product Retouching Tips
Editing jewelry and product photos requires precision to make items look polished and appealing. AI tools can quickly remove dust, scratches, or minor color issues, which is useful for processing many images at once. However, AI may overlook soft details like reflections, fine textures, or tiny imperfections. Manual retouching lets editors carefully refine these areas, adjust highlights, and improve shine to make products look realistic and professional. This approach is especially important for e-commerce or marketing images, where every detail counts. Choosing the right method depends on; if you need speed or precise, high-quality results.
Tips for better jewelry and product retouching:
- Remove dust, scratches, and blemishes before other edits.
- Use AI for initial corrections, then refine manually for fine details.
- Adjust lighting and shadows to highlight textures and shapes.
- Make sure colors stay true to the actual product to maintain trust with viewers.
Portrait Editing That Feels Natural AI vs. Manual Photo
 Portrait editing is all about keeping the subject looking polished while still feeling natural. AI tools can quickly smooth skin, adjust tones, and brighten features, making it useful for large batches of photos or fast results. However, AI may sometimes overdo edits, remove natural textures or change facial details too much. Manual editing allows a human editor to refine small areas carefully, keeping skin texture, facial features, and expressions realistic. This approach is ideal for professional portraits, headshots, or any image where authenticity matters. Choosing the right method depends on; if you want speed or a highly detailed, natural-looking result.
Tips for natural portrait editing:
- Start by assessing the photo to see which areas need small correction.
- Use AI for initial smoothing, then adjust manually to preserve textures.
- Keep highlights, shadows, and skin tones balanced for realism.
- Avoid over-editing to maintain the person’s unique features.
Landscape Shots Brought to Life
Editing landscape photos is all about improving colors, lighting, and details to make the scene more vivid and realistic. AI tools can quickly adjust sky tones, brightness, and contrast across an entire image, making it ideal for batch processing or quick fixes. However, AI may sometimes over-saturate colors or miss small details like shadows, reflections, or textures in nature. Manual editing allows editors to fine-tune each area carefully, preserving natural elements while improving depth and clarity. This approach gives landscapes a balanced, lifelike appearance that feels true to the scene. Choosing the right method depends on; if you are going to prioritize speed or detailed, realistic results.
Tips for improving landscape shots:
- Adjust sky, foreground, and shadows separately for better balance.
- Use AI for quick overall fixes, then refine manually for small details.
- Pay attention to natural colors to avoid over-saturation.
- Improve textures like water, rocks, or foliage to add depth.
Balancing Speed and Accuracy in Editing
 Finding the right balance between speed and accuracy is important in photo editing. AI tools are great for saving time, as they can quickly adjust colors and basic corrections across many images. However, fast edits may sometimes sacrifice fine details or create unnatural results. Manual editing gives full control over every aspect of a photo, making precise and high-quality outcomes, but it takes more time. Many professionals combine both approaches; using AI for initial adjustments and manual edits for detailed refinement. This strategy helps achieve efficiency and accuracy without compromising the quality.
Tips for balancing speed and accuracy:
- Use AI for batch edits to save time on basic corrections.
- Focus manual edits on areas that need precision, like textures or facial details.
- Compare before and after results to make sure that quality is maintained.
- Develop a workflow that blends AI efficiency with human refinement for the best outcome.
How to Choose Between AI vs. Manual Photo
Choosing between AI and manual photo editing depends on your goals, timeline, and the level of detail you need. AI is ideal for quick fixes, batch processing, or when you need consistent results across many images. Manual editing is better when precision, natural appearance, and creative control are priorities, especially for high-end portraits, products, or complex scenes. Often, the best results come from combining both approaches: using AI for initial adjustments and manual editing to refine details. Understanding your project’s needs and the strengths of each method will help you decide which approach to use.
Tips for deciding which method to use:
- Assess the complexity of the photo and the level of detail required.
- Consider your timeline and if speed or perfection is more important.
- Use AI for general corrections and manual editing for fine-tuning.
- Test both methods on a sample image to see which gives the best results.
Conclusion
Exploring real-life examples of AI vs. manual photo editing shows how each method has its strengths. AI is fast and efficient, perfect for large batches or simple fixes, while manual editing offers precision and a personal touch that machines can’t replicate. Many professionals find that combining both approaches gives the best results, saving time without sacrificing quality. Now we want to hear from you, have you tried AI, manual editing, or a mix of both? Which method do you prefer for your photos and why? Share your thoughts in the comments and let’s discuss how you handle photo editing in your work or projects.
Read Next: How to Improve AI Photo Editing Results with Manual Adjustments