
Top 5 ISO Techniques for Clearer and Brighter Shots
Getting clear and light photos isn’t just about having a good camera, it’s about knowing how to control your settings, especially ISO. Many photographers, especially beginners, struggle with getting the right balance between light and clarity. If your photos often turn out too dark or filled with grainy noise, your ISO might be the main reason. ISO can seem confusing at first, but once you understand how it works, it becomes a powerful tool in your photography kit. With just a few smart ISO techniques, you can take cleaner and brighter photos in different lighting situations.
In this guide, we’ll walk you through five simple ISO techniques that can make a big difference in your shots. These tips are great for anyone, if you’re using a DSLR, mirrorless camera, or even a smartphone with manual settings. You don’t need to be a tech expert to apply them, just a bit of patience and some practice. Once you get the hang of it, you’ll start to notice a real improvement in the quality of your images. Let’s get started and make your next shots sharper, cleaner, and better lighted.
ISO plays a key role in how your photos turn out, especially in tricky lighting. A low ISO keeps your photos clean in light that clearly shows details, while a higher ISO helps improve lighting in darker places, but too much can add grain. That’s why learning when and how to adjust it is important. Start by practicing in different lighting so you can see how ISO affects the result. Combine it with small changes in shutter speed and aperture for better control. With a limited time, you’ll feel more confident using ISO to get the look you want in your photos.
Here are The Top 5 ISO Techniques
Understand What ISO Really Does
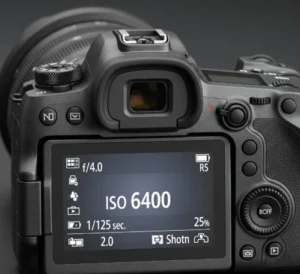
ISO is one of the three basic camera settings that control how light or dark your photo looks, the other two are shutter speed and aperture. In simple words, ISO controls how sensitive your camera is to light. A lower ISO (like 100 or 200) means your camera is less sensitive, which is great for clear settings like outdoor daylight. A higher ISO (like 800 or 1600) increases sensitivity, helping you take brighter shots in darker places. However, the higher you go, the more likely you’ll see grain or “noise” in your photo.
 To get the most out of ISO, start by keeping it as low as possible for the clearest image, then raise it only when needed. If you’re indoors or shooting at night, increasing the ISO can help Clear up the image, but do it gradually to avoid too much noise. Always check your camera’s preview or histogram to see how the exposure looks. If your image still seems off, try adjusting your shutter speed or aperture along with ISO for better balance. Don’t be afraid to experiment, every lighting situation is different. With practice, choosing the right ISO will become a natural part of your shooting process.
Knowing ISO techniques helps you avoid common photo problems like underexposure (too dark) or overexposure (too light). It also helps you decide when to adjust ISO versus changing shutter speed or aperture. Think of ISO as your backup tool when there isn’t enough light. But remember, it works best when used carefully.
To get the most out of ISO:
- Use low ISO (100–200) for light, clear scenes
- Use mid-range ISO (400–800) indoors or on cloudy days
- Use high ISO (1600 and above) for night shots, but expect some grain
- Always test your camera’s ISO limits, every model is a bit different
- Use noise reduction tools if your photo gets too grainy
Use Low ISO in Natural Light
When shooting in natural light, like on a sunny day or outdoors at noon, using a low ISO setting is the best way to keep your photos clear and sharp. A low ISO (usually around ISO 100 or 200) helps reduce the chances of grain or noise in your images, giving you smooth and detailed results. Since there’s already plenty of light available, your camera doesn’t need to increase sensitivity. This setting also allows you to take natural colors and crisp details without overexposing the scene. Beginners often find this useful when practicing outdoor photography, landscapes, or portraits in daylight.
Using low ISO in clear conditions also makes it easier to play around with other camera settings like shutter speed and aperture. For example, you can use a faster shutter speed to freeze motion or adjust your aperture for creative depth of field effects without worrying about noise. It’s a simple step, but it can make your photos look more professional and polished.
Here are a few quick tips to remember:
- Set your ISO to 100 or 200 when shooting outdoors in daylight.
- Use your camera’s auto ISO feature only if you’re unsure, but double-check the results.
- Pair low ISO with a fast shutter speed to avoid overexposure.
- Keep an eye on your histogram to make sure your photo isn’t too light.
- Practice in different daylight situations to see how ISO affects your shots.
Adjust ISO for Low-Light Conditions
 Taking photos in low-light situations can be tricky, especially if you want to avoid using a flash. This is where adjusting your ISO can really help. Raising your ISO makes your camera more sensitive to light, allowing you to take brighter photos even when the scene is dark. However, the higher the ISO, the more likely you’ll see noise or grain in your image. That’s why finding the right balance is important, you want enough brightness without losing too much image quality.
When you’re indoors, shooting at night, or in dim environments, don’t be afraid to increase your ISO to 800, 1600, or even higher depending on your camera. Just remember that different cameras handle high ISO differently, some produce more noise than others. To get the best low-light photos without too much grain, try these tips:
- Start with ISO 800 and go higher only if needed
- Use a tripod to avoid blurry shots when using slower shutter speeds
- Combine higher ISO with a wide aperture (like f/1.8 or f/2.8)
- Use available light sources like lamps or windows to help brighten your shot
- Edit your photos later to reduce noise if needed
Find the Sweet Spot on Your Camera
Every camera has an ISO “sweet spot”, a setting range where your photos look light and clear without too much noise. This sweet spot is usually somewhere between ISO 100 and 800, depending on your camera model. It’s the range where your camera performs best and gives you good lighting with sharp details. Going above this range can still work, especially in darker places, but that’s when grain starts to appear more. Finding your camera’s sweet spot helps you get better quality photos with less effort in editing.
To figure out your camera’s best ISO range, try shooting the same scene using different ISO levels. Look at the images closely and compare them, notice when the grain starts to become visible and when the photo still looks clean. Knowing this will help you make better choices in different lighting conditions.
Here are a few simple steps to help you test:
- Set your camera on a tripod and take the same photo using ISO 100, 200, 400, 800, and above
- Zoom in on each photo and check for changes in noise and detail
- Pay attention to color quality, high ISO can sometimes dull the colors
- Write down which ISO levels still look good to you
- Practice using these ISO settings in real shooting situations
Pair ISO with Shutter Speed and Aperture
 ISO works best when it’s balanced with your other camera settings, shutter speed and aperture. These three work together to control how light or dark your photo will be, a system known as the exposure triangle. If you raise your ISO, you can use a faster shutter speed to freeze motion. Or if you want a blurry background, you can open the aperture wider and keep the ISO lower. The goal is to find a good mix that keeps your photo clear, light, and free from too much grain or blur.
When you learn how to pair ISO with shutter speed and aperture, you gain more control over every shot. For example, in low light, you might raise the ISO a bit, use a slower shutter, and open your aperture to let in more light, all without overexposing. It’s about adjusting all three settings based on what the scene needs.
Here are a few tips to help you combine them well:
- In natural light: use low ISO, fast shutter speed, and smaller aperture (like f/8)
- In low light: raise ISO, use a wider aperture (like f/2.8), and try a slower shutter
- For moving subjects: raise ISO so you can use a faster shutter without darkening the photo
- For portraits: keep ISO low, use a wide aperture for background blur
- Always check your shot and adjust as needed, it’s okay to take a few test photos
Conclusion
Learning ISO techniques is a smart way to take control of your photography. Instead of relying only on auto settings, insight ISO gives you more freedom to shoot in different lighting. Start with small changes, like adjusting ISO in low light or sunlight, and notice how it affects your pictures. Pairing ISO correctly with shutter speed and aperture will help you get better results. Don’t be afraid to make mistakes, that’s how you learn. With time and practice, these ISO techniques will become second nature.
ISO techniques doesn’t have to be difficult, it just takes a little practice and the right knowledge. With these five simple techniques, you can take brighter, clearer photos no matter the lighting conditions. The more you experiment, the better you’ll understand how ISO affects your shots and how to pair it with your camera’s other settings. If you’re shooting with a DSLR, mirrorless, or even a phone with manual controls, these tips can make a big difference. Now it’s your turn, try out these techniques and see how your photos improve. Got any personal tips or questions about ISO? Share them in the comments, we’d love to hear from you.
Read Next: Serving International Clients with Top Photo Editing