Here’s how to easily edit your graduation photos like a pro! You’ve done it you’ve…

Flawless Portraits with Expert Photoshop Techniques and Tips
Creating flawless portraits means combining technical skills with a keen eye for detail and understanding human features. For photographers and photo editors, mastering portrait editing in Photoshop can greatly enhance your work and distinguish you from others.
In this article, you will learn the fundamental tricks in Photoshop that help bring out flawless portraits. Mastery of the basic skills involves understanding the interface, using the basic tools, and adjusting skin tone. We will be walking you through how to blemish retouch, enhance facial features, and work with lighting to deliver high-impact images. Also, learn how to add realistic textures and do color correction for the best finish. Avail yourself of these skills to deliver stunning natural portraits.
Essential Photoshop Skills for Flawless Portraits
First, before getting into the complex details, one should master the very basics of Photoshop through which fault-lines portraits can be obtained. That would mean making one comfortable with the interface, maneuvering through layers, and learning basic editing tools such as Brush, Clone Stamp, and Healing Brush. For manipulating face features and setting them in their proper proportions, get used to the Warp and Perspective tools. Perfect use of adjustment layers to deliver subtle color and exposure corrections. Being able to work out these very important skills in Photoshop will be the foundation to perfect portraits.
Flawless portraits in Photoshop depend on how well one can grasp these essential basic skills. It might be skin tone correction, refining facial features, or enhancing the general outlook of the image-all require a deep understanding of Photoshop. With mastered basics, expertise will be built on producing portraits that are not only visually stunning but naturally flawless, too.
A Guide to Natural-Looking Portraits
Understanding skin tones is crucial in achieving faultless, natural portraits. This goes to mean that it requires a good deal of comprehension about the anatomy of human skin and how colors and tones work within it. Look at the color wheel first to determine whether your skin has pink, yellow, or neutral undertones. Employ the Color Panel in Photoshop to make precise enhancements to the skin tone to make sure it easily merges into the image. Small, cautious adjustments will help you avoid over-correction and have your skin still appear natural.
First edit the skin texture in small steps, selecting parts with the Lasso tool for finer tuning. A very handy tool is the Eyedropper, which picks up the color from the surroundings and helps in merging with the rest of the shot. Once you get these skills right in Photoshop, your portrait shoot can be flawless.
Removing Blemishes and Imperfections
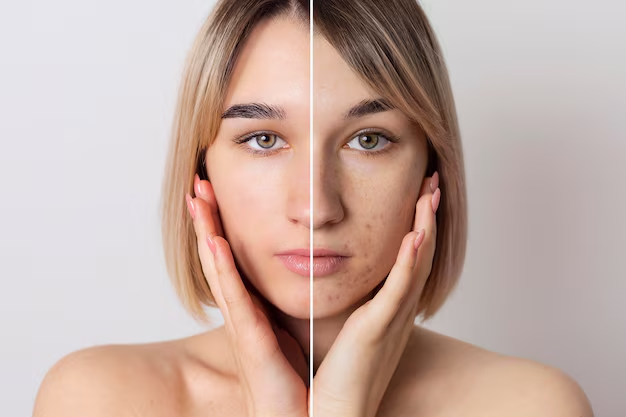
Retouching is an important feature of portrait perfection, and learning these basic principles will help you come away with clutter-free images. Start by finding and dealing with all types of imperfections like blemishes, acne, or scarring. For small blemishes, the Spot Healing Brush would serve best, while for larger and more intricate problems, the Clone Stamp tool works best. Subdue your adjustments and work in small increments to avoid over-processing.
It is very important to retain the subject’s natural texture and tone. Use the soft brush tool, as it will allow the joining of the blended parts of the retouched areas with the skin to be perfectly merged for a seamless join, looking natural. Pay attention to the edges for the transitions to be coherent in the portrait. With these general techniques of retouching, portraits will reach higher quality and a polished faultless finish.
Techniques for Perfecting Eyes, Nose, and Mouth
Smoothening the facial features requires certain knowledge of human anatomy, and the process is quite exacting. One can start with the eyes by removing the imperfections of redness or dark circles using the Clone Stamp tool, changing the shape and size using the Warp tool for more natural dimensions. The nose should be liquefied into a refined shape and size but without affecting the contours of the subject.
Refine the mouth by using the Liquify tool to subtly change its shape and contours. Attempt to process in small steps so as not to overdo the processing. Lastly, shade and give dimension to the image using the Brush tool to make it look as natural and realistic as possible. With these tricks, you will be able to perfect each feature and achieve a flawless, polished portrait.
Note:
- Eyes
– Any redness or dark circles, or other types of defects, can be cleaned with the Clone Stamp tool.
Any shape and size adjustment should be done with the Warp tool so it can appear natural. - Nose
– Refine shape and size by using the Liquify tool to preserve a natural curvature of contours. - Mouth
– By means of the Liquify tool, make changes in shape and size subtly by paying attention to its curvature and contour.
Shade with the Brush tool and add dimension for a realistic finish.
Working with Lighting
Lighting is not only a fundamental part of capturing perfect portraits, but it also makes the final image sometimes surreal. Master the basics of lighting: natural, artificial, and mixed, understanding where diffused light works magic, creating softness and homogeneity. Take it one step further in Photoshop by using its Brush tool to add subtle shading and give more depth to the portrait.
Pay extra attention to the mood and atmosphere. Brighten up or contrast down to achieve a good balance of the Levels and Curves tool. The Burn and Dodge tools should then be handy in adding the highlights and shadows to bring out the features of your subject to an extra dimensional level. Proper lighting combined with these techniques will surely make you come up with such stunning, high-impact portraits.
Creating Realistic Skin Texture and Veins
For perfect portraits, one needs advanced techniques in creating natural skin texture and the veins. Familiarize yourself with the anatomy of human skin-the patterns, the different textures involved. Use the Brush tool to add subtlety to skin texture and the details, remembering that this should look real and blend into the environment.
With this, natural veins can be established by just using a brush with which to draw very fine, wispy lines in the picture showing the general direction and flow of the natural veins. Always work in small steps and go easy on the processing, since that is how you get natural results. Finally, levels and curves will be used to adjust brightness and contrast so that everything looks harmonious, balanced, and thus more realistic for your portrait.
Balancing Colors for a Flawless Finish
Color correction is important for perfect portraits and requires an eye for detail. First, study the color palette of your image, noticing how colors define its mood and atmosphere. Use the Color Panel to balance the color, ensuring the skin of a subject will blend into the background.
Every minor difference in tone and color plays an important role in making the image look natural. In this regard, it is considered important to take full advantage of the Hue and Saturation tools for color balance and harmony. Then, brightness and contrast should be managed through the Levels and Curves tool to give it a well-balanced and finished touch that brings quality to your portrait.
Adding the Finishing Flair to Your Portrait Masterpiece
Finals are where you get to perfect your portrait master. You can start off with delicate information such as hair, clothes, or accessories. You can then use the Brush tool in adding realistic texture and dimension to the hair of the subject by harmoniously integrating it into the environment.
Work in small steps to make finer adjustments and avoid over-processing. Now, use Levels and Curves tools together for fine-tuning of brightness and contrast. These finishing touches will yield the amazing and high-impact portraits that are a sure mark of your skill. Remember, learning Photoshop techniques-right from the very basic skills to high-end color correction-will only help you get flawless and natural portraits. And with practice and patience, your portraits will be remembered.
Conclusion
Creating perfect portraits in Photoshop requires both a strong technical foundation and artistic vision. Learning to apply basic Photoshop skills, such as navigating through the interface and using tools, all the way to advanced skills such as skin texture and color correction, will allow you to take the next step in portrait work. Your newfound understanding of lighting, retouching, and enhancement of features takes your portraits to a new level and makes them both striking yet natural.
This will enable you to perfect all these skills, with diligent practice and a keen eye for detail, making your portraits stand out not only for their beauty but also for their authenticity. Much learning and experimentation are involved along the path to perfecting your portraiture, but the result will be portraits that not only show your skill but also ones that leave an impression that will last.
Read Next: Mastering Portrait Editing: Tips for Stunning Results


