
Photo Editing How: Master Professional Techniques in 2026
Understanding photo editing how techniques work is essential for photographers, ecommerce businesses, and creative professionals seeking to transform ordinary images into stunning visual content. Whether you're retouching product photos, enhancing portraits, or perfecting jewelry shots, mastering the fundamentals of professional editing can elevate your visual brand and drive better engagement. This comprehensive guide walks you through the essential steps, tools, and techniques that professional editors use to achieve consistently outstanding results in 2026.
Getting Started with Photo Editing Software
Selecting the right editing software forms the foundation of your photo editing journey. The choice depends on your skill level, budget, and specific editing needs.
Choosing Your Primary Editing Tool
Adobe Photoshop remains the industry standard for professional photo retouching, offering unparalleled control over every aspect of image manipulation. Lightroom excels at batch processing and organizing large photo collections with consistent adjustments. GIMP provides a free alternative with robust features for users on a budget.
When deciding which software to use, consider these factors:
- Learning curve: How quickly you need to produce results
- File compatibility: Raw format support for your camera
- Feature requirements: Specific tools like frequency separation or advanced masking
- Budget constraints: Subscription versus one-time purchase options
- Operating system: Mac, Windows, or cloud-based solutions
The best photo editing software comparison reviews can help you identify which platform aligns with your workflow and technical requirements.
Setting Up Your Workspace
Proper workspace configuration dramatically improves editing efficiency. Calibrate your monitor using a hardware colorimeter to ensure accurate color representation across different devices and printing outputs.
| Workspace Element | Recommended Setting | Purpose |
|---|---|---|
| Monitor Brightness | 120 cd/m² | Prevents eye strain and ensures accurate exposure judgment |
| Color Temperature | 6500K (D65) | Matches standard daylight viewing conditions |
| Ambient Lighting | Neutral, indirect | Reduces screen glare and color perception interference |
| Tool Panel Layout | Customized shortcuts | Speeds up repetitive tasks and workflow |
Organizing your panels, creating custom keyboard shortcuts, and establishing a consistent folder structure saves countless hours over time. Many professionals use dual monitors, dedicating one screen to the image and another to adjustment panels and reference materials.

Essential Photo Editing How-To Techniques
Mastering fundamental techniques provides the building blocks for all advanced editing work. These core skills apply across portrait, product, and commercial photography.
Non-Destructive Editing Fundamentals
Always work non-destructively. This golden rule means preserving your original image data while making adjustments on separate layers or through adjustment layers.
Create a duplicate background layer immediately after opening any image. Press Ctrl+J (Windows) or Cmd+J (Mac) to duplicate the layer. This simple step protects your original file from permanent changes.
Use adjustment layers instead of applying changes directly to pixel layers:
- Click the adjustment layer icon at the bottom of the Layers panel
- Select your desired adjustment (Curves, Levels, Hue/Saturation)
- Make your changes within the Properties panel
- Toggle layer visibility to compare before and after states
- Adjust layer opacity to fine-tune the effect intensity
Smart Objects preserve image quality when resizing or transforming elements. Convert layers to Smart Objects by right-clicking the layer and selecting "Convert to Smart Object" before applying filters or transformations.
Color Correction and White Balance
Accurate color representation ensures your images look natural and professional across all viewing platforms.
Step 1: Set Black and White Points
Open the Levels adjustment (Ctrl/Cmd+L) and locate the eyedropper tools. Click the white eyedropper, then click a neutral white or light gray area in your image. This sets the white point. Repeat with the black eyedropper on a dark neutral area.
Step 2: Adjust Midtones
Use the Curves adjustment to fine-tune midtone colors. Create an S-curve for added contrast or adjust individual RGB channels to neutralize color casts.
Step 3: Fine-Tune Specific Colors
The Hue/Saturation adjustment targets specific color ranges. Select a color from the dropdown menu and adjust hue, saturation, and lightness independently without affecting other colors.
Professional editors often reference comprehensive photo editing tutorials to refine their color correction approaches and stay current with best practices.
Exposure and Contrast Adjustments
Proper exposure control brings dimension and depth to flat images.
- Highlights: Recover blown-out areas by reducing highlight slider
- Shadows: Lift shadow detail without introducing noise
- Whites: Set the brightest point that retains detail
- Blacks: Establish the deepest shadow point for contrast
- Contrast: Add global punch or soften harsh transitions
Understanding photo editing how exposure adjustments interact helps you achieve balanced, natural-looking results. Always check your histogram to ensure you're not clipping highlights or crushing shadows unnecessarily.
Advanced Retouching Techniques
Professional retouching goes beyond basic adjustments to address specific imperfections and enhance key features.
Skin Retouching with Frequency Separation
Frequency separation separates texture from color and tone, allowing independent editing of each component.
Creating Frequency Separation Layers:
- Duplicate your background layer twice
- Name the bottom duplicate "Low Frequency" and the top "High Frequency"
- Select the Low Frequency layer and apply Gaussian Blur (typically 3-5 pixels)
- Select the High Frequency layer, go to Image > Apply Image
- Set Layer to Low Frequency, Blending to Subtract, Scale to 2, Offset to 128
- Change High Frequency blend mode to Linear Light
Now you can blur skin tones on the Low Frequency layer while preserving texture, and remove blemishes on the High Frequency layer without affecting color.
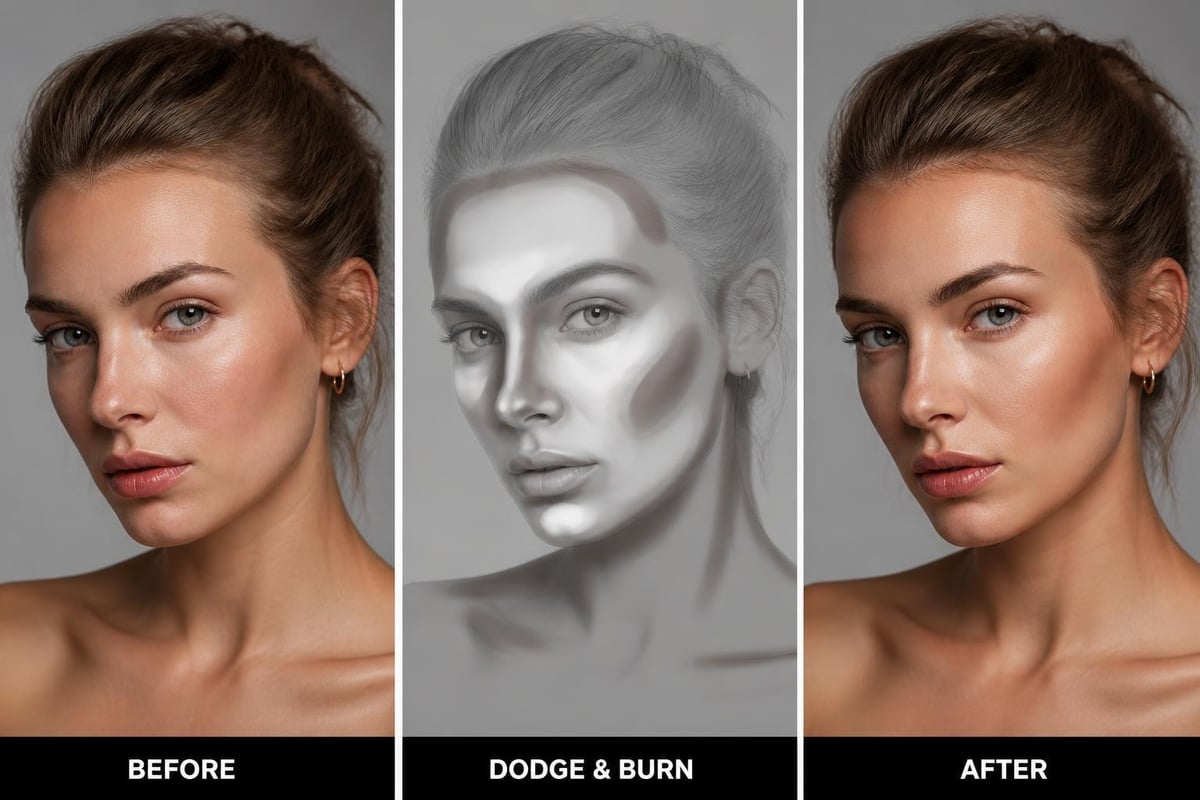
Dodge and Burn for Dimension
This classic technique adds depth by selectively lightening (dodging) and darkening (burning) specific areas.
Create a new layer filled with 50% gray and set the blend mode to Overlay. Use a soft brush with low opacity (10-15%) to paint white on areas you want to brighten and black on areas you want to darken. This technique works exceptionally well for enhancing facial features, adding dimension to products, and creating natural-looking contours.
Background Removal and Replacement
Clean background removal is crucial for ecommerce and product photography. The technique you choose depends on the subject's complexity.
| Selection Method | Best For | Difficulty Level |
|---|---|---|
| Magic Wand Tool | Solid, uniform backgrounds | Beginner |
| Quick Selection | Simple shapes with clear edges | Beginner |
| Pen Tool | Complex shapes requiring precision | Advanced |
| Select and Mask | Hair, fur, and fine details | Intermediate |
| Channel Masking | Transparent or translucent objects | Advanced |
For complex subjects, combine multiple techniques. Start with a rough selection using Quick Selection, then refine edges using Select and Mask. Adjust the Shift Edge slider to contract or expand the selection boundary, and use the Refine Hair tool for capturing fine details.
Professional services like ecommerce photo editing specialize in high-volume background removal, ensuring consistent quality across product catalogs while maintaining natural edges and proper lighting integration.

Understanding why background removal can increase sales helps ecommerce businesses prioritize this essential editing step in their product photography workflow.
Workflow Optimization and Batch Processing
Efficiency separates professional editors from hobbyists. Developing streamlined workflows saves time while maintaining quality.
Creating and Using Actions
Photoshop Actions record sequences of steps that you can replay with a single click. Record common tasks like resizing for web, adding watermarks, or applying your signature color grade.
Recording a Basic Action:
- Open the Actions panel (Window > Actions)
- Click the Create New Action icon
- Name your action and assign a function key if desired
- Click Record and perform your editing steps
- Click Stop Recording when finished
Actions work best for repetitive tasks with consistent requirements. Create separate actions for different image types or output specifications.
Batch Processing Multiple Images
When you need to edit dozens or hundreds of similar images, batch processing becomes essential.
Apply an action to an entire folder:
- Go to File > Automate > Batch
- Select your action from the dropdown menu
- Choose your source folder
- Specify the destination folder for processed images
- Set file naming conventions if needed
- Click OK to process all images automatically
This technique proves invaluable for ecommerce businesses processing product photography at scale. Combine batch processing with custom actions to maintain brand consistency across large catalogs.
Creating Efficient Layer Organizations
Naming conventions prevent confusion when working with dozens of layers. Use descriptive names like "Skin_Texture_Repair" instead of "Layer 1 copy 3."
Layer groups organize related layers into folders. Select multiple layers and press Ctrl/Cmd+G to group them. Color-code groups by right-clicking the folder icon and selecting a color.
Layer comps save different layer visibility states, allowing you to present multiple versions within a single PSD file.
Specialized Photo Editing Applications
Different photography genres require specialized editing approaches tailored to their unique challenges and requirements.
Product Photography Enhancement
Product images demand technical precision and consistency. Focus on accurate color representation, uniform lighting, and clean presentations that showcase product details.
Key product editing steps:
- Remove dust, scratches, and manufacturing imperfections
- Align multiple products symmetrically for catalog consistency
- Correct perspective distortion from lens or shooting angle
- Create perfect shadows that match lighting direction
- Ensure color accuracy matches physical products
Jewelry photography presents unique challenges with reflective surfaces and intricate details. Learn how to take jewelry photos that minimize editing time while maximizing sparkle and clarity.
Portrait and Headshot Retouching
Portrait editing balances enhancement with authenticity. Over-editing creates unnatural, plastic-looking results that viewers immediately recognize.
Focus on these portrait priorities:
- Skin cleanup: Remove temporary blemishes while preserving natural texture
- Eye enhancement: Brighten whites, sharpen iris details, add catchlights
- Teeth whitening: Subtle natural brightening, not glowing white
- Facial contouring: Gentle dodge and burn for dimension
- Hair refinement: Tame flyaways, add volume, enhance shine
Understanding key things to improve in portrait editing helps you identify the most impactful adjustments without crossing into over-processing territory.
Real Estate and Architectural Photography
Real estate images require special attention to perspective correction, lighting balance, and environmental cleanup.
Use the Lens Correction filter to fix barrel distortion and chromatic aberration. The Transform tool straightens vertical lines that appear to converge due to perspective. Window pull techniques blend multiple exposures to show both interior detail and exterior views through windows.
Learning Resources and Continuing Education
Photo editing how skills develop through consistent practice and ongoing education. The field evolves rapidly with new tools, techniques, and technologies emerging regularly.
Online Tutorial Platforms
Structured learning paths help you build skills systematically rather than randomly jumping between techniques.
YouTube photo editing tutorial channels offer free, high-quality instruction covering everything from beginner basics to advanced professional techniques. Channels like PHLEARN provide comprehensive courses on specific editing topics.
PhotoWorks tutorials cover various techniques including automatic photo enhancement and specialized corrections that complement your manual editing skills.
Practice Projects and Challenges
30-day editing challenges push you to experiment with new techniques daily. Set specific themes like "portrait retouching week" or "product photography perfection."
Before-and-after comparisons document your progress and help identify areas needing improvement. Save original files alongside finished edits to track skill development over time.
Style recreation exercises involve analyzing professional work and attempting to recreate the look. This reverse-engineering approach teaches you how specific effects are achieved.
Community Feedback and Critique
Join online photography and retouching communities where members provide constructive feedback. Platforms like Reddit's r/postprocessing or specialized Facebook groups connect you with editors at various skill levels.
Professional critique helps identify blind spots in your editing approach. What looks perfect to you might have issues that trained eyes immediately spot.
Quality Control and Final Output
The final steps before delivering images ensure your work meets professional standards across all viewing contexts.
Pre-Delivery Checklist
Before marking any project complete, verify these quality elements:
- Zoom to 100%: Check for missed spots, halos, or artifacts
- Multiple monitor check: View on different screens if possible
- Print preview: Simulate how images appear in print if relevant
- File naming: Follow client specifications or consistent conventions
- Format verification: Export correct file types (JPEG, PNG, TIFF)
- Color space conversion: sRGB for web, Adobe RGB for print
- Resolution check: Meet specified DPI requirements
- Metadata embedding: Include copyright and contact information
Exporting for Different Platforms
Each output destination requires specific optimization settings.
| Platform | File Format | Color Space | Resolution | Max File Size |
|---|---|---|---|---|
| Web Display | JPEG (80-90%) | sRGB | 72 DPI | 200-500 KB |
| Social Media | JPEG (85%) | sRGB | 72 DPI | Platform-specific |
| Professional Print | TIFF/PSD | Adobe RGB | 300 DPI | As needed |
| Ecommerce Sites | JPEG/PNG | sRGB | 72 DPI | 1-2 MB |
| Client Review | JPEG (90%) | sRGB | 150 DPI | 1-3 MB |
Sharpening should be the final step after resizing. Apply output sharpening appropriate to the viewing medium. Web images need less sharpening than print images.
Version Control and Archiving
Maintain organized archives of your work for client revisions and portfolio development.
Save layered master files (PSD or TIFF) separately from final deliverables. These masters allow you to make changes without starting from scratch. Use external hard drives or cloud storage with redundant backups to protect against data loss.
Create a consistent folder structure: ClientName/ProjectDate/Raw/Working/Finals. This organization system scales as your client base grows.
Advanced Editing Technologies
Cutting-edge technologies are transforming photo editing how workflows function in professional environments.
AI-Powered Editing Tools
Artificial intelligence now handles many time-consuming tasks with impressive accuracy. AI-powered tools can automatically remove backgrounds, enhance facial features, upscale low-resolution images, and apply complex adjustments with single-click simplicity.
Neural Filters in Photoshop 2026 use machine learning to perform sophisticated edits like age transformation, expression changes, and style transfers. While these tools accelerate workflows, they work best when combined with manual refinement for professional results.
Learning how to make attractive AI product photos helps ecommerce businesses leverage automation while maintaining brand consistency and quality standards.
Non-Destructive Editing Innovations
Research into advanced editing frameworks continues pushing boundaries. Recent developments like PhotoDoodle explore new paradigms for creative image manipulation, as documented in academic research on photo editing innovations.
Methods such as guided image synthesis with stochastic differential equations balance realism with creative control, hinting at future capabilities that will further transform professional editing workflows.
Mobile Editing Integration
Professional mobile apps like Lightroom Mobile and Photoshop Express enable on-location editing and client preview capabilities. Sync settings across desktop and mobile devices create seamless workflows whether you're in the studio or on-site.
Tablet-based editing with pressure-sensitive styluses brings precision retouching tools to portable formats. Many professionals now perform initial selects and basic adjustments on tablets before moving to desktop workstations for detailed retouching.
Professional Development and Business Integration
Understanding photo editing how techniques evolve supports both skill development and business growth for photography professionals and editing service providers.
Building Client Relationships Through Quality
Consistent, high-quality editing builds client trust and generates repeat business. Develop clear communication protocols that set expectations for turnaround times, revision policies, and deliverable formats.
Create style guides documenting your editing approach for different project types. These guides ensure consistency across multiple editors and provide clear references for client discussions about aesthetic preferences.
Scaling Your Editing Operations
As project volume increases, consider whether to handle all editing in-house or partner with professional editing services. Many photographers and ecommerce businesses find that outsourcing routine editing tasks frees them to focus on shooting, creative direction, and client relationships.
Professional retouching providers at Photo Editing Company handle high-volume projects while maintaining quality standards, offering services from basic color correction to advanced manipulation for clients worldwide.
Setting Competitive Pricing
Research market rates for editing services in your specialty and geographic area. Factor in your skill level, turnaround time, and value-added services when establishing pricing structures.
Pricing models to consider:
- Per-image rate for product and ecommerce work
- Hourly rate for complex retouching projects
- Package rates for wedding or event photography
- Subscription models for ongoing client relationships
- Rush fees for expedited delivery
Track your actual editing time per image type to ensure pricing remains profitable as you gain efficiency through improved workflows and automation.
Mastering photo editing how techniques transforms raw captures into polished professional images that drive engagement and conversions across all visual media platforms. By building strong fundamentals, developing efficient workflows, and staying current with evolving technologies, you can consistently deliver outstanding results that exceed client expectations. Whether you're handling your own editing needs or managing high-volume projects, Photo Editing Company offers professional retouching services with expertise in background removal, color correction, and specialized editing for ecommerce, jewelry, and portrait photography worldwide.