Are you a real estate photographer who is starting in the real estate industry?. This…
Real Estate Photo Editing Guide
In today’s busy real estate market, competition is tough. People search online for the perfect property, and good pictures can make a big difference. Even if you have a great sales pitch, bad pictures can turn people away and you might lose potential buyers. That’s why it’s important to have top-quality photos of your property by following this editing guide. You need to show off all the great things about your house or building.
But how do you make your real estate photos look amazing and catch people’s eye online? Don’t worry, we’ve got a simple guide to help you. We’ll show you how to make basic adjustments like making the picture brighter or fixing the colors, as well as some more advanced tricks like blending different exposures or fixing crooked angles. By following these steps, you can make your property look its best and attract more buyers.
Here’s a step-by-step editing guide to help you get started.
Step 1: Look for errors and photo noises.
In the photo fixing part, it’s not cool to rush straight into making changes. Instead, it’s smarter to first check if there are any mistakes or weird things in the picture. Like, are the colors looking good together? Are there any things that shouldn’t be there, like random objects? Maybe the sky looks weird and needs fixing, or the grass needs to be greener. You’ve gotta make a list of all the stuff that needs fixing, big or small, so you don’t end up doing too much and making the property look fake. So, take it slow and steady, and think through each step carefully. That way, your real estate photos will turn out awesome!

Step 2: Begin with the basic adjustments.
Now that you have your editing guide and a list of post-production methods ready, it’s time to dive into the basic adjustments. These include tweaking the brightness, contrast, saturation, vibrance, and white balance of your images. However, you don’t necessarily have to adjust all of these properties for every photo. It really depends on the lighting conditions and the mood you want to set for each property.
If you decide to include all adjustments mentioned in your editing guide, make sure to strike a balance among them. You don’t want any single adjustment to overpower the others. Also, don’t forget to enhance the sharpness of the image to ensure clarity and detail. By carefully following your editing guide and adjusting these basic properties, you can enhance the overall appeal of your real estate photos and make them more visually appealing to potential buyers.
Step 3: Perform color correction.
Color correction is crucial in real estate photography for achieving a natural and realistic appearance in your images. It’s essential to exercise restraint during this process to avoid images looking washed out or overly saturated. Aim to replicate the vibrant colors found in the real world, ensuring that your property images appear authentic. By striking the right balance in color correction, you can significantly enhance the appeal of your photos, making them more visually captivating to potential buyers. Paying attention to detail in color correction can make a significant difference in the overall presentation and effectiveness of your real estate marketing efforts. Remember, subtlety is key; don’t overdo it, but strive for a natural and appealing look that accurately represents your property.

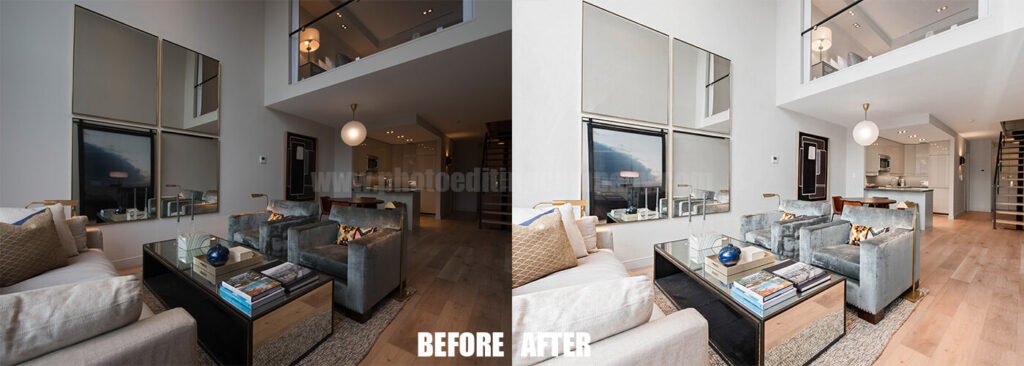
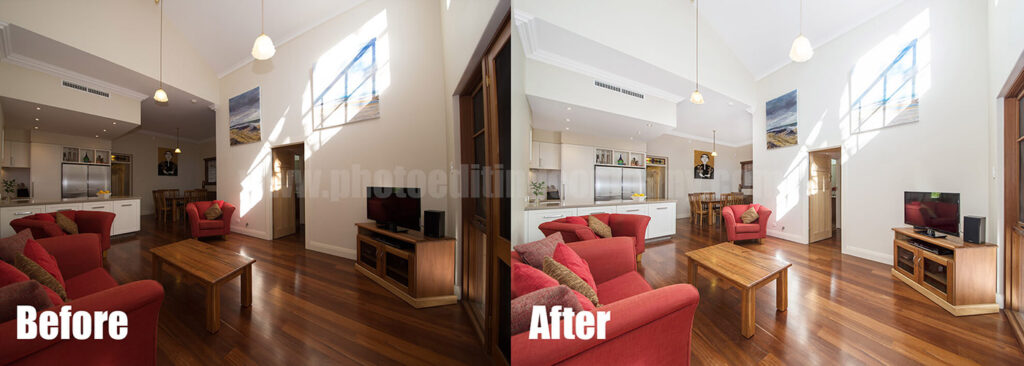
Step 4: Correct the lighting and atmosphere.
This is where you can set the mood for your property images, following your editing guide. Every photographer knows that shooting indoors is quite challenging; luckily, there’s post-editing. While you have the chance to correct the lighting and atmosphere in your images, look for certain noises like unwanted shadows, dark corridors, dim lights, and bluish tint. The factors that may cause these photo noises are bad weather, tinted windows, and fluorescent bulbs. Remember, property images are ideally bright and vivid, so avoid dark corridors and dim lights. By paying attention to these details during the editing process, you can enhance the overall quality and appeal of your real estate photos. Don’t hesitate to adjust brightness, contrast, and color temperature to create a more inviting atmosphere. Additionally, consider using techniques like dodging and burning to selectively lighten or darken areas as needed.
Ultimately, the goal is to ensure that your property images accurately reflect the ambiance and character of the space. With careful editing, you can transform ordinary photos into compelling visual representations that attract potential buyers.
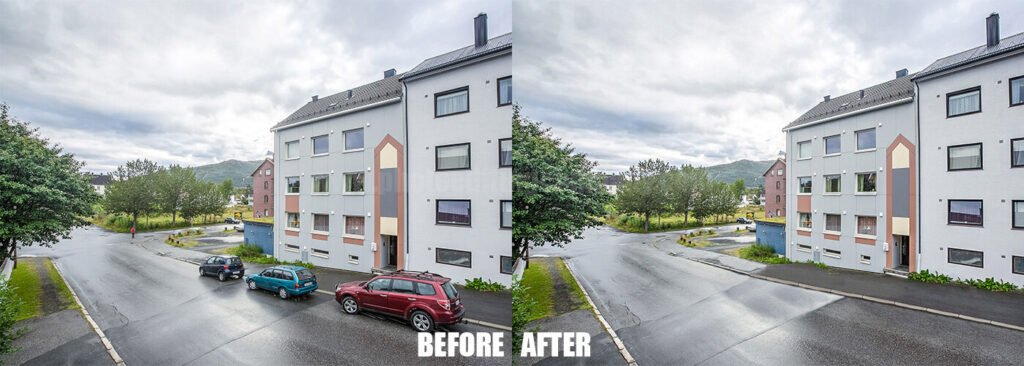
Step 5: Add or remove objects.
This technique outlined in your editing guide is quite crucial for a real estate business. The photo editor must have a skilled eye in adding or removing objects in a property image, following the editing guide. While this mostly comes from clients’ requests, both parties must understand that the output mustn’t look unrealistic or too promising. Some of the details you can remove are wires, wall stains, parked cars, or people around the property. You may also remove unnecessary statues that block the building’s view. On the other hand, if you find the set-up too empty, you may add flower vases, television, wall frames, and even couches. Just make sure that every object you add is for “display purposes only.”
By carefully editing these elements, you can create a more visually appealing representation of the property. However, it’s crucial to strike a balance between enhancing the image and maintaining its authenticity. Remember, the goal is to provide potential buyers with an accurate and enticing portrayal of the property’s potential. With attention to detail and adherence to your editing guide, you can achieve stunning results that attract interest and drive sales.
Step 6: Edit the background.
Yes, backgrounds can always be edited according to your editing guide. For most real estate business owners, they’d prefer the background to be a mix of blue, green, and brown shades, as it creates a scenic and more natural view. Unlike product photos, white and black backgrounds don’t work well on real estate images. Remember, your pictures are supposed to be lively and vibrant — how can you achieve this when your backdrop is too dull? Use Photoshop’s clipping path tool to edit backgrounds and achieve that picturesque view.
By incorporating these colors and editing techniques, you can enhance the overall appeal of your real estate photos and make them more visually appealing to potential buyers. Don’t forget to maintain a balance between realism and aesthetic appeal in your editing process. With attention to detail and adherence to your editing guide, you can create stunning images that showcase the beauty and potential of your properties.
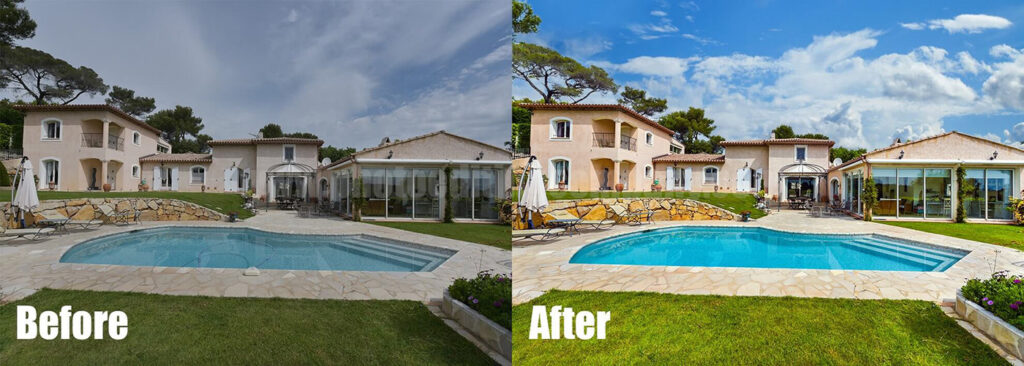
Step 7: Apply the sky replacement technique.
If you want to achieve a perfect outdoor view, you may apply the sky replacement technique according to your editing guide. There are instances when you have an urgent shoot, and the weather isn’t so pleasing. Also, you don’t always get the perfect sunset.
With just a few clicks on Lightroom, you can turn gloomy skies into a sunny day, following your editing guide. Sunrise and evening skies are also available on the software. And our favorite part is you can choose what type of sunset you want to apply: pink skies, crimson, or orange suns.

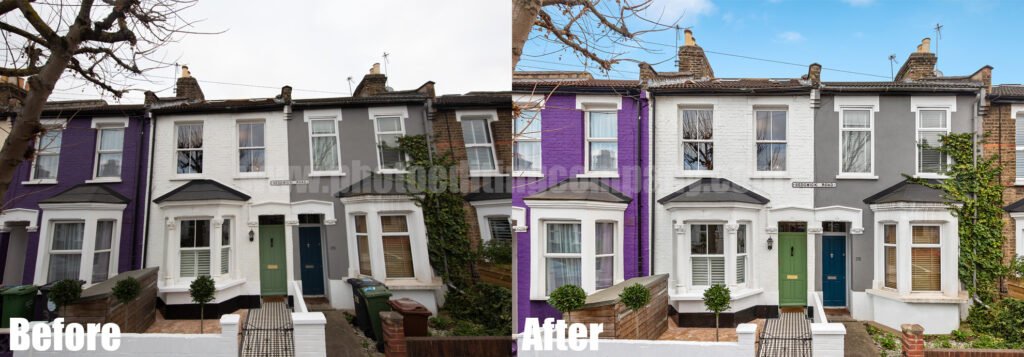
Step 8: Straighten the lines.
This process, known as perspective correction, is essential according to your editing guide. It focuses on your photo’s vertical and horizontal lines. When your property image looks bent or distorted, it means the perspective is wrongly shot.
Luckily, you can easily align and straighten the distorted lines in Photoshop, following your editing guide. One way to do it is to use the Free Transform tool. Just select the entire image and drag the corners that need an alignment. Another option is to click the Perspective Warp tool and manipulate the control points to align your subject with the frame. Choose the most convenient method for you and make your images more natural, compact, and cohesive.
Step 9: Crop and resize your image.
Now that you’ve added all the necessary edits for your product images according to your editing guide, you need to focus on the most important details. You can do this by cropping your photos. Just make sure not to remove any essential parts and keep the composition accurate.
On the other hand, resizing your images can improve their loading capacity online. Large files aren’t friendly on webpages; hence, optimizing your property images can bring you more traffic and audience engagement. Moreover, establishing a uniform size for your real estate photos will make your website more attractive and enticing.
Step 10: Polish your images and use HDR.
Finally, you’ve come to the last step of the real estate post-processing according to your editing guide. It’s time to polish your images — check whether there are still noises left and if you’ve missed editing minor and major details.
Put up the final and magic touch by using HDR on your real estate photos. HDR is the perfect technique if you want to increase luminosity. You can achieve this by merging different shots and adjusting the highlights and shadows.

Conclusion
The perfect recipe for any editing process, as outlined in your editing guide, is a practiced eye, advanced software, and dedication. You may follow all the steps enumerated in this article or skip a few ones — depending on your output. Just remember the golden rule for real estate photos: they should be vibrant, lively, realistic, and sellable to potential clients.
Related Posts

This Post Has 0 Comments