Studio Photography Equipment Guide
Studio Photography requires a combination of technical expertise, creativity, and the right equipment. With the right tools, you can produce amazing images that showcase your subjects in the best possible light. In this guide, we’ll take you through the ultimate guide in using the equipment for studio photography. Covering everything from choosing the right camera to learning camera settings and from understanding for studio photography. Studio lighting tips and tricks for getting the most out of your equipment, especially if you are new of taking shots and less knowledge on it.
Studio Camera Selection
When it comes to studio photography, the camera is the foundation of your setup. You’ll want a camera that can handle high-quality images, has good low-light performance, and offers manual controls to allow for precise adjustments. Look for a camera with a full-frame sensor, as they tend to produce better image quality and are more versatile. Consider a camera with a high pixel count, as this will provide more detail and flexibility in post-processing. Finally, think about the type of shoot you’ll be doing most often. If you’ll be shooting portraits, a camera with a good autofocus system and a wide range of focal lengths will be important.
Some popular options for studio photography cameras include the Canon EOS 5D Mark IV, the Nikon D850, and the Sony Alpha a7R IV. These cameras offer a range of features and settings that make them well-suited for studio photography. When choosing a camera, consider the lens options available, as well as the camera’s ability to handle multiple shots per second and shoot in RAW format.
It’s also important to consider the price of the camera. While a high-end camera may offer more features and better image quality, it’s not necessarily the best option for every photographer. Look for cameras that fit within your budget and offer the features you need.
Ultimately, the right camera for studio photography needs will depend on your personal preferences, the type of shoots you’ll be doing, and your budget. Take the time to research and test out different cameras before you will make decision.
Camera
Selecting the right camera and lens is pivotal for studio photography. Your choice should align with your photography style and the subjects you intend to photograph. While DSLRs and mirrorless cameras are popular, consider the specific features you need, like resolution, sensor size, and compatibility with various lenses.
Studio Lighting Basics
Studio lighting is an important aspect for studio photography, and understanding the basics is important for producing high-quality images. There are three main types of studio lighting continuous, flash, and LED. Continuous lighting is ideal for live view shooting and allows you to see the exact lighting effect in real-time. Strobe lighting is ideal for high-speed shooting and offers a more varied range of lighting options. LED lighting is energy-productive and provides a soft, even light.
 Each type of lighting has its own unique characteristics and uses. Continuous lighting is great for portraits, and it allows for natural-looking skin tones and a relaxed atmosphere. Flash lighting is ideal for high-energy shoots, such as fashion or sports photography, as it provides a burst of light that can freeze fast-moving subjects. LED lighting is great for product photography, as it provides a soft, even light that won’t strongly show small details. When choosing a lighting kit, consider the type of shoots you’ll be doing most often. For portraits, a continuous lighting kit may be the best option.
When shooting fast-action shots, a flash lighting kit works well. For product photography, an LED lighting kit is often the top choice. It’s also important to consider the power and flexibility of the lighting kit. Look for kits that offer adjustable power levels, as well as multiple lighting heads and stands. This will give you the flexibility to create a wide range of lighting setups and adapt to different shooting situations. Ultimately, the right for studio photography is the studio lighting kit for your needs it will depend on the type of shoots you’ll be doing, the power and flexibility you need, and your budget.
Lighting Basics
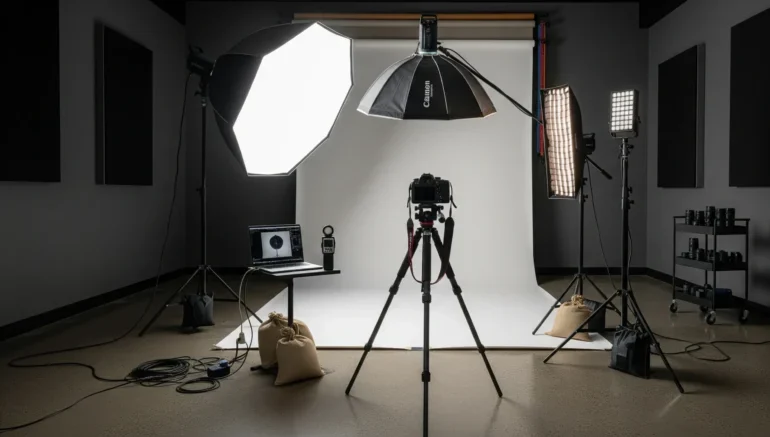
Lighting is the cornerstone for studio photography, influencing the mood and quality of your photos. A mix of softbox lighting and LED bulbs can provide even and adjustable lighting, needed for various shooting scenarios. Consider investing in a lighting kit that includes different types of lights, such as softboxes and umbrella lights, to experiment with shadow and depth in your images.
The top lighting equipment for studio photography includes continuous lighting, strobe lighting, modifiers, accessories, and lighting control. If you’re taking pictures of people, objects, or products, using the correct lighting gear can help you get the look and feel you want. Improve your studio photography by investing in the right lighting equipment and accessories. This will help you create better images that highlight your creativity and skills.
Accessories for Studio Photography
Accessories are used to improve and extend the functionality of your lighting equipment. They can make your workflow more efficient and convenient. They’re incredibly versatile, working both on and off-camera, which makes them perfect for a variety of shooting situations. On the other hand, strobes are more powerful studio lights that need a dedicated power source. They provide more power and control, perfect for studio setups when you need extra intensity to get the best shot. Here are some of the top accessories for studio photography
 In addition to a camera and lighting kit, there are few of needed accessories that can help you produce high-quality images. Tripods are a must-have for studio photography, as they allow you to stabilize your camera and avoid camera shake. Look for tripods that are sturdy, adjustable, and offer a high level of precision.
Reflectors are another needed accessory for studio photography. They can help to bounce light onto your subject’s face and body, creating a more even and natural-looking lighting effect. Look for reflectors that are collapsible and offer a range of sizes and shapes. Other important accessories include backdrops, which can help to create a seamless and professional-looking image support gear, such as grips and clamps, which can help to secure your camera and lighting equipment and memory cards, which can help to store your images and prevent data loss.
When choosing accessories, consider the type of shoots you’ll be doing most often and the specific needs of your setup. Look for accessories that are high-quality, durable, and offer the features you need. Also, consider the price of the accessories and if they fit within your budget. Ultimately, the right accessories for studio photography needs it will depend on the type of shoots you’ll be doing, the specific needs of your setup and your budget.
Here’s a list of important camera equipment:
- Camera – The main tool for taking pictures.
- Lenses – Changeable glass parts that focus the image onto the camera.
- Tripod – A stand that holds the camera still.
- Lights – Used to brighten the scene.
- Backdrops – Backgrounds for your photos.
- Reflectors/Diffusers – Tools to control how light falls on your subject.
- Light stands – Stands to hold your lights.
- Remote shutter release – A way to take pictures without touching the camera.
- Memory cards – Store your photos.
- Camera bag – Keeps your camera gear safe.
Learning the Art of Camera Settings
 Camera settings are key in studio photography. The lens opening, controls how much light enters the camera to create clear images. Shutter speed refers to the length of time the camera’s shutter is open, which also controls the amount of light that enters the camera. ISO refers to the camera’s sensitivity to light, which can be increased or decreased to adjust the overall brightness of the image.
When adjusting aperture, shutter speed, and ISO, match them to your shoot and effect. For portraits, use a wide aperture like f/2.8 to blur the background. If you’re shooting a landscape, you may want to use a narrow aperture (such as f/16) to create a deep depth of field and keep everything in focus.
It’s also important to consider the lighting conditions and the camera’s ability to handle high-contrast scenes. If you’re shooting in low light, you may need to increase the ISO to allow more light into the camera. If you’re shooting in bright light, you may need to decrease the ISO to prevent too much light.
Ultimately, learning the art of camera settings is a skill that takes practice and experimentation. Take the time to learn about the different settings and how to use them effectively.
Studio Photo Editing & Retouching
Post-production is an important part for studio photography and understanding how to use editing and retouching software is important for producing high-quality images. Editing software, such as Adobe Lightroom and Adobe Photoshop, allows you to adjust the brightness, contrast and color balance of your images, as well as remove blemishes and imperfections.
Retouching software, such as Adobe Photoshop, allows you to make more complex adjustments, such as removing objects from the scene or changing the shape and size of objects. It also allows you to improve the overall appearance of the image, such as adding texture and depth.
 When editing and retouching your images, consider the type of shoot you’ll be doing and the desired effect. For example, if you’re shooting a portrait, you may want to use editing software to adjust the brightness and contrast of the image, as well as remove blemishes and imperfections. If you’re shooting a product, you may want to use retouching software to remove any imperfections or blemishes on the surface of the product.
It’s also important to consider the level of detail and precision you need when editing and retouching. Look for software that offers a range of tools and adjustments, as well as precise control over the editing and retouching process.
Ultimately, the role of post-production for studio photography is to improve and refine the images you’ve . Take the time to learn about the different editing and retouching software and how to use them effectively to produce high-quality images.
Studio Equipment Tips & Tricks
Here are some helpful tips and tricks for Studio Photography to maximize your gear.
- Always use a tripod to stabilize your camera and avoid camera shake.
- Experiment with different lighting setups and angles to create a unique and interesting image.
- Use reflectors to bounce light onto your subject’s face and body, giving a smoother and more natural lighting look.
- Pay attention to the background and use a backdrop or other props to create a seamless and professional-looking image.
- Use editing and retouching software to improve and refine your images and remove any imperfections or blemishes.
By following these tips and tricks, for studio photography equipment and produce high-quality images that showcase your skills and creativity for taking a shot.
Conclusion
Studio photography combines technical knowledge, creativity, and the right tools. By following this guide, you’ll be on track to create high-quality photos that show off your skills and creativity. Make sure to pick the right camera and lighting, understand your camera settings, and use editing software to improve your images. With practice and trying new things, you’ll get the best results from your studio equipment and create impressive photos. for studio photography you will have a good quality camera for a perfect shooting on your customer or model, product etc.
Read Next: Pros and Cons of Best Photography Studios for Product Shots


