Finding the perfect pajamas for your kids can be fun and easy. With so many…

Learn Manual Mode and Take Better Photos Today
Learning to use manual mode on your camera can help you take better pictures. Instead of letting the camera choose the settings, you get to decide how bright the photo is, how movement looks, and what stays sharp. It might feel hard at first, but once you learn how ISO, shutter speed, and aperture work together, it becomes easier to use.
Manual mode lets you change the settings based on the photo you want. You can make the picture brighter or darker, clearer or softer, and choose what part stays sharp. The more you practice, the easier it gets. It’s a great way to learn and slowly get better at taking photos.
Learn the Exposure Triangle
 The exposure triangle has three parts: ISO, shutter speed, and aperture. These three work together to make your photo brighter or darker. When you learn how each one works, it’s easier to take the kind of photo you want.
ISO controls how much light your camera takes in. A low ISO is good when it’s bright, and a high ISO helps in dark places but can make your photo look a bit rough. Shutter speed is how fast the camera takes the photo. A fast one can freeze movement, and a slow one can show blur. Aperture is how big the hole in the lens is. A big hole lets in more light and makes the background blurry. A small hole keeps more of the photo clear.
When you change one setting in the triangle, you usually have to change the others too so your photo still looks right. If you use a faster shutter speed, your photo might be too dark. You may need a bigger aperture or higher ISO to fix it. Learning how these three work together helps you take better photos in manual mode.
Keep ISO Low When You Can
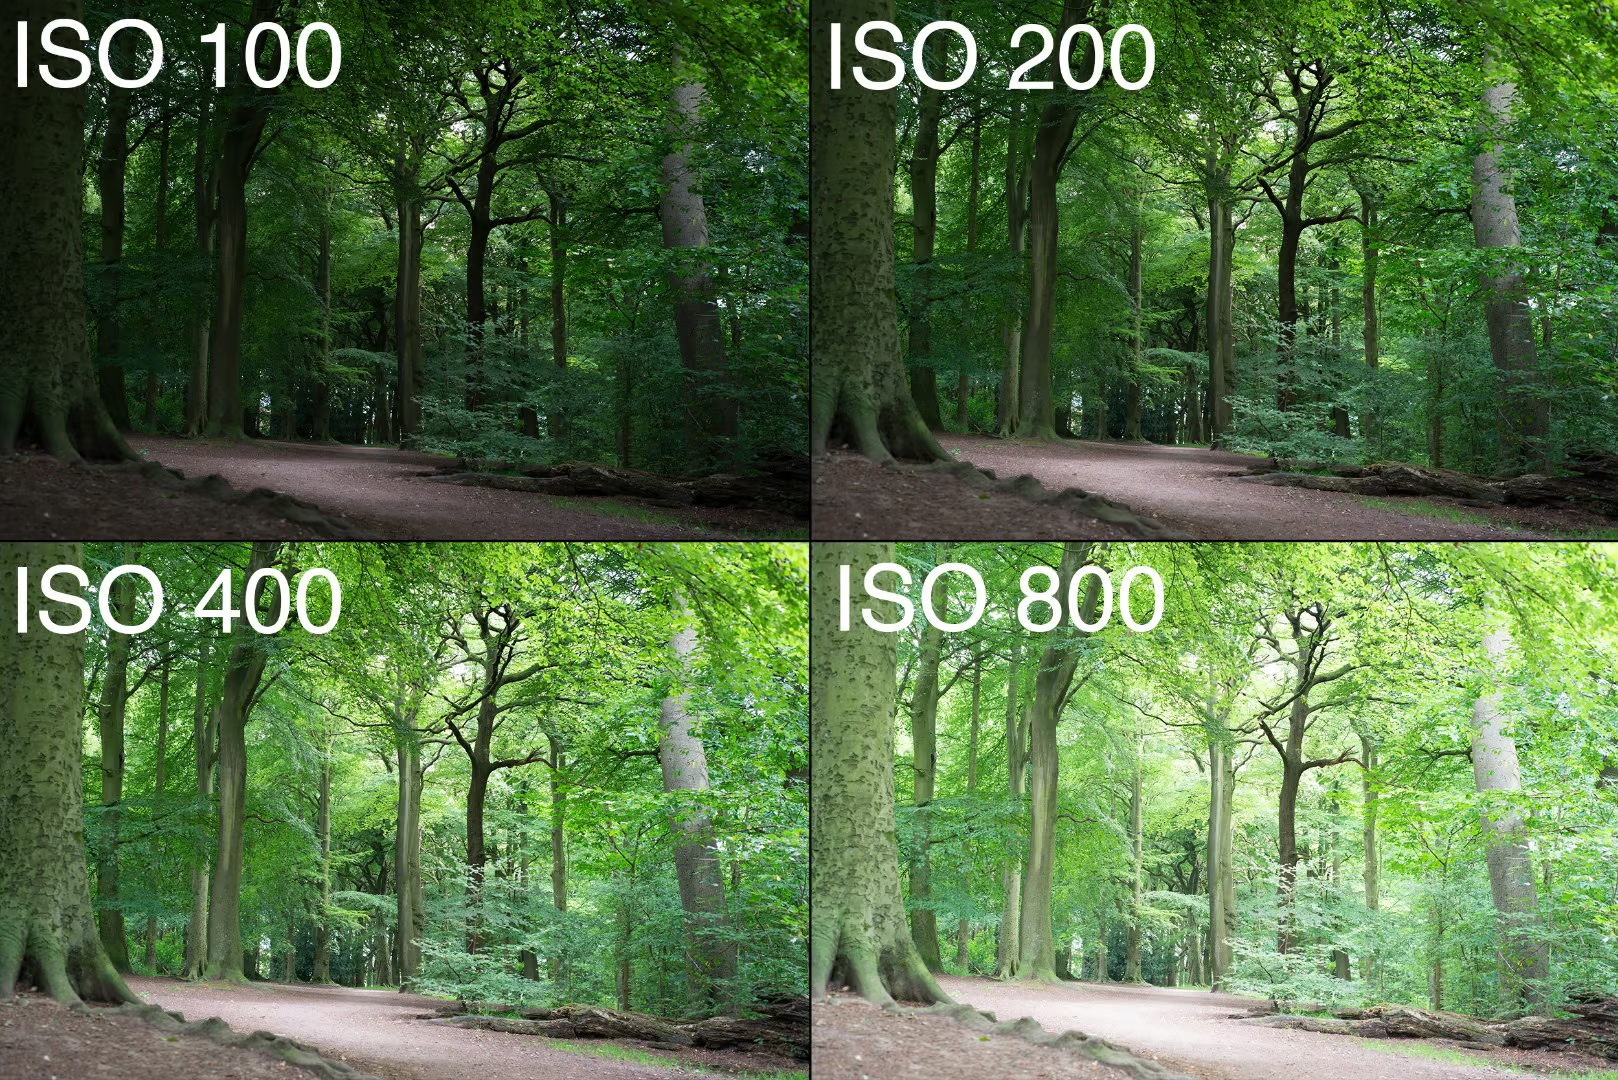 ISO controls how much light your camera can see. A low ISO like 100 or 200 is good for bright places. A high ISO like 1600 helps in dark places, but it can make the photo look rough or grainy.
That’s why it’s better to keep ISO low when there’s enough light. On a sunny day or when using a tripod, low ISO gives you a cleaner photo. The picture will look smoother and more clear without the tiny dots that come from high ISO.
Sometimes, you need to use a higher ISO, like when you’re indoors or it’s dark outside. But first, try changing your shutter speed and aperture to let in more light. If it’s still too dark, then slowly raise the ISO. This way, you can make the photo brighter without making it look too rough.
Control Movement with Shutter Speed
 Shutter speed controls how long your camera lets in light. A fast shutter speed, like 1/1000 of a second, lets in light for a very short time. This is good when you want to stop fast movement, like a person running or a car going by. The photo will look clear with no blur.
A slow shutter speed, like 1/30 of a second or more, keeps the camera open longer. This can make moving things look blurry in the photo. Sometimes, this is a nice effect like making a waterfall look soft and smooth. But if your hands move while using a slow speed, the whole photo can turn out blurry. Using a tripod can help keep the camera steady.
When you control your shutter speed, you can decide how movement looks in your photos. Think about what you want to show do you want everything to look sharp and still, or do you want to show motion and flow? Changing the shutter speed helps you tell that story in a simple and creative way.
Change Focus Area with Aperture
 Aperture controls how wide or narrow the lens opening is. When the aperture is wide (a small f-number like f/1.8), more light comes in. This makes only a small part of the photo sharp, while the background or foreground gets blurry. This is perfect for portraits because it makes the subject stand out with a soft, blurry background.
When the aperture is narrow (a large f-number like f/16), less light comes in, and more of the image stays in focus. This is great for landscape photos, where you want everything like the nearest rock and the farthest mountain to be sharp and clear.
By changing your aperture, you can control what’s in focus. A wide aperture blurs the background to highlight your subject, while a narrow aperture keeps everything in focus. Knowing how to use aperture helps you create the look you want in your photos.
Watch the Light Meter
 The light meter in your camera shows if your photo is too bright, too dark, or just right. It’s usually shown as a scale on your screen or through the viewfinder. When the mark is in the middle, your photo is balanced. If it’s on the left, the photo is too dark, and if it’s on the right, it’s too bright.
By watching the light meter, you can adjust your settings to get the right exposure. If the meter shows your photo is too dark, you can open the aperture, slow down the shutter speed, or raise the ISO. If it’s too bright, do the opposite. This helps you make sure your photos look good, even if the lighting changes.
The light meter is a useful guide, but it’s not always right. In tough lighting, like when there’s a lot of bright light or shadows, it might suggest settings that don’t work well. In these cases, trust your own judgment and try different settings until you get the exposure you want.
Try Manual Focus
 Manual focus lets you decide where the camera focuses, instead of letting it do it automatically. This is useful when the autofocus has trouble, like in low light or when objects are close together. By turning the focus ring on your lens, you can pick which part of your photo is sharp, giving you more control over your shots.
Manual focus is perfect for close-up shots, where the camera may have trouble focusing on tiny details. It helps you get the sharpest focus on tiny things you want to highlight, like a flower petal or a small insect. This control is important when you need precision, and autofocus can’t do the job.
While autofocus works well in many cases, manual focus can help improve your photos. It might take some practice to get used to, especially if you’ve never used it before, but it gets easier with time. Once you’re comfortable, it gives you better control and results in your images.
Use Live View or Histogram
 Live View and the histogram are helpful tools to improve your photos. Live View lets you see a preview of your photo on the camera screen before you take it. This helps you adjust focus, brightness, and composition in real time. You can make sure the image is sharp and well lit before pressing the shutter button.
The histogram is a graph that shows how light or dark your photo is. It appears on your camera’s screen and shows a range from dark on the left to bright on the right. A balanced histogram means your photo has a good mix of light and dark. If the graph is too far to one side, you may need to change your exposure settings to fix it.
Live View and the histogram give you immediate feedback to help you make better choices while shooting. They are especially useful in tricky lighting or when you want more control over the final image. Using these tools helps you get the right settings and improve your photos before you take the shot.
Try Bracketing
 Bracketing is when you take several photos of the same scene with different settings, usually for exposure. For example, you might take one photo with the normal exposure, one a bit brighter, and one a bit darker. This lets you compare and choose the best one. Bracketing is helpful when the lighting is tricky and you’re not sure about the right exposure.
Bracketing helps you get the best shot, especially when the lighting is tricky. For example, if you’re taking a photo of a sunset, the sky might be bright, but the ground could be dark. Bracketing lets you adjust for both the bright and dark parts, so you don’t lose any details. Later, you can pick the best photo or even combine them for a perfect result.
Bracketing is easy to do and gives you peace of mind because you have different versions to pick from. It’s also a great way to practice adjusting exposure settings. Once you get the hang of it, you’ll feel more confident handling tricky lighting and taking better photos.
Set White Balance Yourself
 White balance helps make sure the colors in your photo look natural. Different lights, like sunlight or indoor bulbs, can make your photo look warm or cool. For example, sunlight can make your photo look yellow or orange, while indoor lights can make it look blue or green. Adjusting the white balance fixes these colors and makes everything look more real.
Many cameras have preset white balance settings like “Daylight,” “Cloudy,” or “Tungsten” to adjust the colors based on the light. But these settings may not always give you the best result. By adjusting the white balance yourself, you can get more accurate colors, especially in tricky lighting.
Manually setting white balance gives you full control over your photos’ colors. It may take some practice, but once you know how to adjust it for different lights, your photos will look more natural. It’s a simple but helpful tool in manual mode that can really improve your photos.
Practice and Be Patient
 Learning to use manual mode takes time, so be patient with yourself. The more you practice, the easier it will be to understand how the settings work together. At first, it may feel tricky with all the changes to make, but with time, it will get easier. Remember, every photo you take helps you improve, even if it’s not perfect at first.
Being patient also means giving yourself time to try new things. Don’t be afraid to make mistakes or try something different. Some of the best lessons come from experimenting and seeing what works and what doesn’t. The more you try, the better you’ll understand your camera and what works best for the photos you want to take.
With practice and patience, manual mode will become easier and give you full control over your photos. It might take a few weeks or months to feel confident, but all the effort will help you take better photos. Keep at it, and remember that photography is a skill that gets better over time.
Conclusion
Learning manual mode can really improve your photography by giving you control over your photos. It might take time to get used to settings like ISO, shutter speed, and aperture, but with practice, you’ll get the hang of it. Don’t get discouraged if things don’t turn out perfect at first. Each step gets you closer to mastering the technique.
Remember, the key is to keep practicing, be patient, and try new things. As you get more familiar with your camera, manual mode will become a helpful tool to show your creativity. Take your time, enjoy the process, and watch your photography skills improve.
Read Next: Master Camera Modes for Stunning Shots
Related Posts


Comments (0)