In real estate, first impressions are everything. When buyers or renters look at your property…

Guide to Real Estate Photo Editing for Amazing Home Images
In today’s busy real estate market, people see your property online first, and they decide fast. High-quality photos can be the difference between catching a buyer’s eye or getting overlooked. This Guide to Real Estate Photo Editing will help photographers, real estate agents, and property managers learn how to edit photos well to make pictures look better and sell homes.
This guide will take you step-by-step through the most important editing techniques to make your real estate photos shine. Learn how to use lighting, color correction, and advanced tools to make homes look their best; helping you attract more buyers and sell faster.
Here’s a Simple Guide to Real Estate Photo Editing
 Color Correction
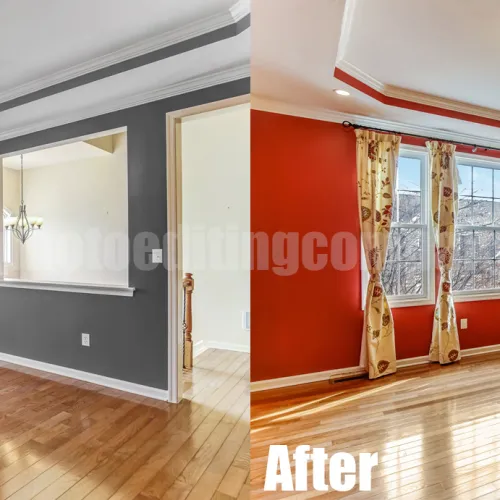
Color correction is one of the most important steps in real estate photo editing. It helps make photos look bright, clear, and true to life. When colors are off, homes can look dull or too fake, which turns off potential buyers. Correcting colors brings out the natural beauty of the space and makes everything look more polished. It’s often the first thing editors do when starting a project. A good color balance helps set the tone for the rest of the editing.
The goal of color correction is to make images look realistic and professional. You want whites to look white, not too yellow or blue, and colors to appear just as they would in person. For example, walls should show their true color, and natural lighting should feel warm but not overpowering. This adjustment is key for online listings where buyers rely on photos to decide if they like a property. It helps avoid surprises during in-person visits. Accurate colors also build trust with your audience.
Color correction can be done easily with photo editing software like Adobe Lightroom or Photoshop. These tools let you adjust brightness, contrast, highlights, shadows, and color tones. Even small tweaks can make a big difference in how a room looks. If done well, color correction improves the mood of a photo and makes it more inviting. It’s a simple but powerful step in creating market-ready real estate photos. Consistent color correction across all images also helps maintain a professional look for your brand.
 White Balance Adjustment
White balance adjustment plays a big role when editing real estate photos. Different light sources, like sunlight or indoor lamps, can change how colors appear in your images. Sunlight might give warm, golden tones, while artificial lights often cast an orange or yellow shade. If these colors aren’t balanced, the picture can feel unnatural or strange. White balance helps correct this by making the colors look more accurate and natural. It ensures the photo has the right color temperature so the space feels real and welcoming.
This editing step works by removing unwanted color casts caused by lighting conditions. For example, indoor lights often add a warm, yellowish tint that doesn’t match the actual colors of the room. Meanwhile, shadows or areas away from light can sometimes look too cool or blue. Adjusting the white balance smooths out these color differences and gives the photo a more even and realistic feel. This helps the space look fresh and appealing to potential buyers browsing online or in brochures.
One of the best parts about white balance is that it doesn’t have to be perfect when you’re shooting. Cameras often struggle with mixed lighting, so fixing the colors afterward is common and expected. Editing tools like Adobe Lightroom or Photoshop make it simple to tweak white balance during post-processing. This gives you more control over the final look of your images and ensures your real estate photos stand out. With a well-balanced color tone, your pictures will look professional and inviting.
 Vibrance Adjustment
Vibrance adjustment is a key step in making real estate photos look natural and eye-catching. It works together with color correction and white balance to fine-tune the colors in your images. Unlike just cranking up saturation, vibrance carefully boosts the softer, muted colors while leaving stronger colors alone. This helps keep the photo balanced without making it look overdone or fake. Using vibrance keeps your images realistic and visually pleasing, which is important when showing off a property.
One great thing about vibrance is that it stops certain colors from becoming too intense or unnatural. For example, it prevents reds from becoming overly bright and distracting. It also keeps blues sharp and vibrant, instead of fading into pale or dull shades. This careful control helps your photos feel fresh and inviting, which can really make a difference in marketing real estate. Vibrance adjustment ensures every color in the photo looks just right and helps the space feel welcoming.
Adjusting vibrance is simple in most photo editing programs, making it a quick way to enhance your photos. When used well, it helps muted colors stand out without going overboard. This makes the whole photo look more attractive and professional. For real estate photography, vibrance is perfect because it adds life to a scene while keeping it believable. It’s a simple but powerful tool that can boost the appeal of any property photo.
 HDR
HDR
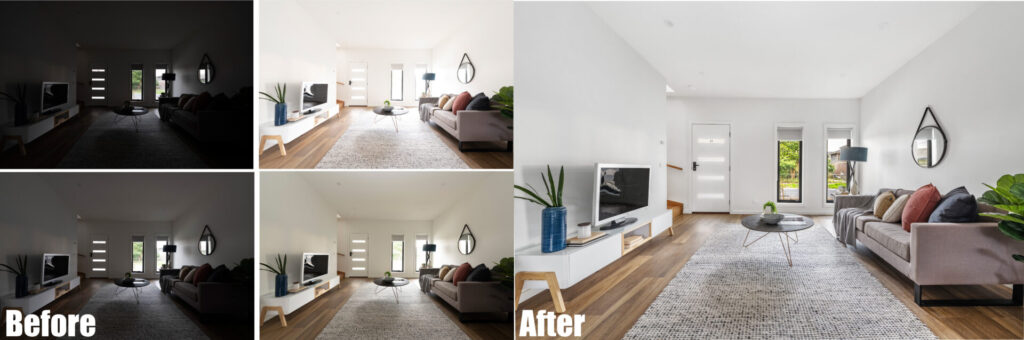
HDR, which stands for High Dynamic Range, is a technique that helps balance the bright and dark areas in a photo. It ensures that highlights don’t get washed out and shadows still hold detail. This is especially useful in real estate photography, where rooms often have bright windows alongside darker corners. By blending multiple exposures, HDR creates images that are evenly lit and inviting. This approach is essential for showing properties at their best in photos.
HDR works best in scenes with strong contrasts, like outdoor shots or interiors flooded with natural light. It combines several images taken at different brightness levels to reveal details in both the highlights and shadows. This lets you capture the full range of lighting without losing important features to overexposure or underexposure. Applying HDR to real estate photos makes spaces look brighter and more appealing. It’s a great way to highlight a home’s true character.
However, HDR isn’t perfect for every type of photo. When used on images with people, it can sometimes make skin look unnatural or overly smoothed. Since HDR focuses on light balance rather than subtle textures, it can give faces an unrealistic appearance. For photos featuring people, other editing techniques often produce better results. Knowing when to use HDR ensures your images look both realistic and beautiful.
 Minor Retouching
Most real estate properties don’t always look flawless when photographed. Small imperfections or distractions can sometimes take away from the overall impact of the image. That’s where minor retouching plays an important role. This editing makes simple fixes to improve the photo without changing how the property really looks. It’s a subtle way to clean up the image while keeping it natural and believable.
Common small retouching tasks include darkening a TV screen to reduce glare or brightening a dull ceiling. Removing stains or marks from walls is another typical fix, as these little flaws can catch a buyer’s eye in the wrong way. Outdoor areas like lawns and swimming pools often benefit from small enhancements, too. Making the grass look greener or the water clearer can help make these spaces feel more welcoming and well-maintained.
These small changes don’t change the key features of the home but help the photo appear more polished and professional. Minor retouching is especially helpful when staging or lighting conditions during the shoot weren’t ideal. It offers a quick and effective way to enhance photos without going overboard. This technique allows real estate agents and photographers to showcase properties at their best while maintaining authenticity. Ultimately, it helps generate more interest by presenting homes in a clean, appealing way.
 Major Retouching
Major retouching in real estate photos means making bigger changes while keeping the image natural and real. It allows editors to add or remove objects to improve the overall appeal of the property. For example, you might add a cozy fireplace or a decorative vase to enhance a room’s atmosphere. At the same time, distractions like power lines, parked cars, or camera reflections can be removed. These adjustments help keep the focus on the property’s best features without altering its true condition.
However, it’s important to use major retouching responsibly. You shouldn’t hide serious flaws or damage, such as holes in the lawn or structural issues, as this would be misleading. The goal is to tidy the scene and show the space in the best way without losing honesty. It’s common to remove people from photos of public or empty properties to keep the space open and welcoming. When done correctly, major retouching helps create polished, professional images that catch buyers’ attention while staying true to reality.
Photo Stitching
Photo stitching combines multiple photos with overlapping areas and similar lighting to create wide panoramic images. This technique captures large rooms, outdoor spaces, or landscapes that don’t fit in one shot. The result is a smooth, high-resolution panorama that helps buyers see the property’s size and layout better.
Stitching images can be tricky because it needs exact alignment and pixel matching to avoid visible seams or distortions. Luckily, modern editing software makes this easier, letting photographers blend photos quickly and accurately with just a few clicks. Using photo stitching in real estate photos makes them more attractive and gives clients a better viewing experience.
 Noise Reduction
Noise in photos looks like tiny grainy dots that make real estate images less clear and sharp. It usually happens in low light or with cameras that don’t handle high pixels well. Excessive noise can make the photos look unprofessional and distracting, which may turn off potential buyers. Reducing noise is essential to maintain the quality and appeal of your real estate photos.
Noise reduction is an editing technique that smooths out these grainy textures without losing important details. By carefully applying this process, you can restore clarity and improve the overall look of your images. Most photo editing software offers noise reduction tools that help balance sharpness with smoothness. Learning to control noise effectively ensures your real estate photos look clean, polished, and ready to attract interest.
Cropping and Resizing
Cropping and resizing are important editing techniques that help improve the composition of real estate photos. Cropping allows you to remove unnecessary parts of an image to better highlight the property or key features. It helps create a more balanced and focused photo, making sure viewers’ attention is drawn exactly where it should be. Resizing changes the image size to fit different platforms, helping it load faster and look better on websites.
When cropping real estate photos, be careful not to cut out important parts like fixtures or structures. These might include things like electrical posts, water towers, or unique architectural features that give the property its character. Keeping these intact preserves the authenticity of the image while still improving its overall look. Thoughtful cropping and resizing can make your photos more appealing and effective in marketing the property.
Lens Correction (Vertical and Horizontal)
Lens correction, often known as perspective control, is a crucial step in real estate photo editing. Sometimes, photos can look distorted with vertical lines leaning inward or outward and horizontal lines appearing stretched or compressed. This distortion can make a space look fake or badly taken, hurting the quality of your images. Correcting these issues helps ensure that walls, doors, and other architectural features look straight and natural.
Fixing vertical and horizontal alignment is important for good real estate photos. If the photo looks warped or the perspective is off, lens correction can fix it. This makes your photos look balanced, real, and more appealing to buyers. It’s a simple but essential step that should never be overlooked.
Color Cast Removal
Color cast removal is an important editing technique used to fix unwanted color tints caused by different lighting conditions. In real estate photos, natural and artificial lights can sometimes create strange hues on surfaces. For example, fluorescent bulbs often add a blue tint, while tinted windows can make walls appear darker or change their true color. These color casts can make the property look less appealing or inaccurately represented.
Color cast removal fixes colors to show the true look of walls, furniture, and more. This makes the photo look natural and balanced, helping buyers see the property as it really is.
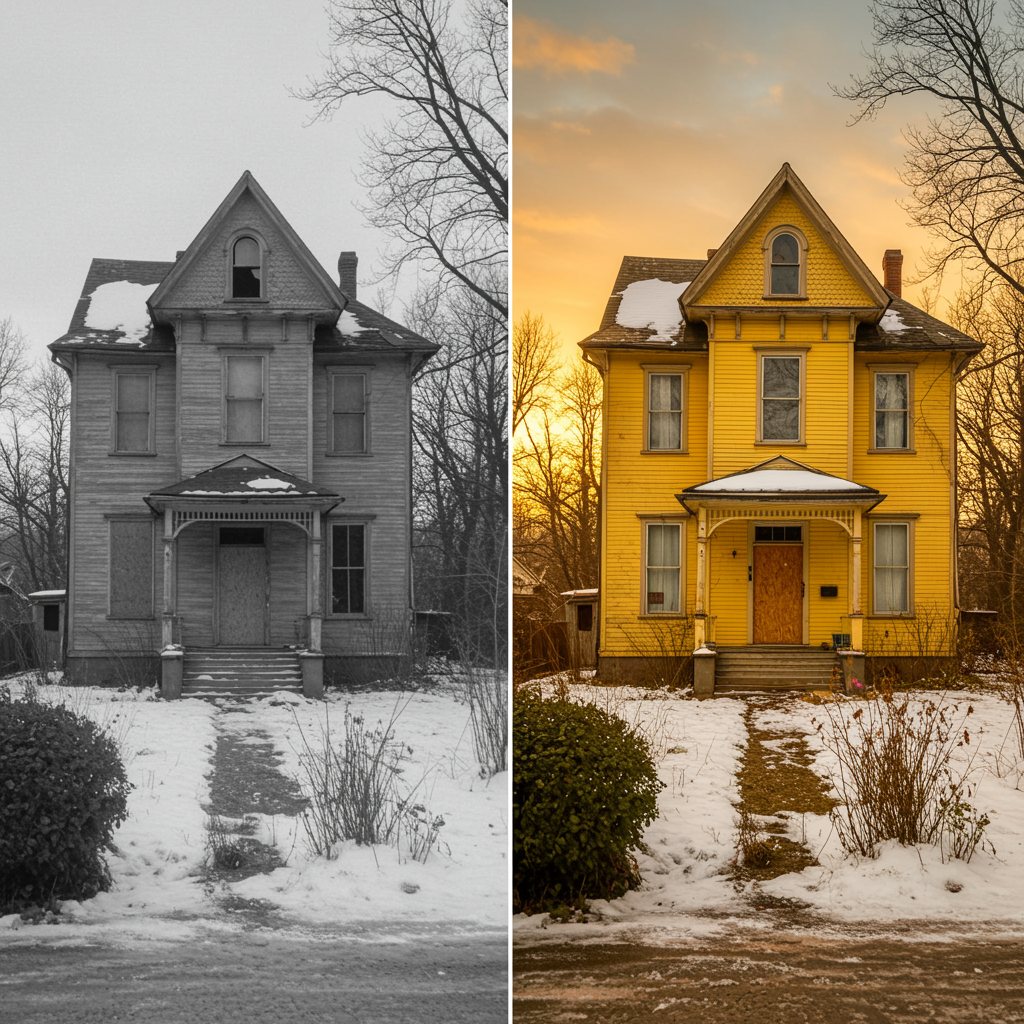
 Sky Replacement (Exterior and Interior)
Gloomy and overcast skies can be a real disappointment for any real estate photographer. Turn dark days into bright, sunny days through the Sky Replacement technique. You can even put sunset into the picture and convert day to dusk if deemed necessary. Again, the goal is to make your real estate photos natural, vibrant, and full of life.
Blurring Objects
The blurring or smoothing effect removes outlier pixels or image noises. When editing real estate photos, you may blur the car plate number or wall frames. Blur is safe to use when some details are unnecessary but not distracting enough to remove. While some editing techniques focus on color intensities, the blurring effect focuses on pixel intensity.
Lens Vignetting
Vignetting is the darkening effect around the edges of a photograph. It can have a good or bad effect on photography. Vignetting can occur due to lens properties and camera settings. If you want to draw attention to certain image parts, you may apply the vignette effect. However, if the background is equally important as the subject, this effect would be a big no-no. Lens vignetting would generally depend on the photographer’s preference and the client’s request.
Remove Chromatic Aberration
Chromatic aberration is also called color fringing or chromatic distortion. It occurs when lenses can’t bring all color wavelengths to the same focal plane. You can reduce the aberration by using concave and convex lenses and avoiding white light as a lighting source. Luckily, Adobe Lightroom has a chromatic aberration removal. Simply zoom in the image part with distortions and click the “Remove Chromatic Aberrations” checkbox to edit your photo.
 Window Outdoor Exposure
Window outdoor exposure is always a challenge for real estate photographers. Apart from brightness, you don’t want to waste the stunning views outside. Through Adobe Photoshop and Lightroom, you can show the view through the windows using the Window Masking tool. Just make sure you have at least two exposures of the same image — room interior and window view. After a few layering and image adjustment, you’ll surely get picture-perfect results!
Lens Flare Removal
Lens flare occurs when your lens system responds negatively to bright light. The method of removing lens flare may depend on various conditions: loss of contrast, colors and shapes, and light streaks. Removing lens flare in Photoshop is easy; just use the Spot Healing Brush, Patch, or Clone Stamp tools. Editing under “loss of contrast” and “light streak” conditions may require longer work. But with the right knowledge and preparation, you can surely achieve desirable results.
Multiple Exposure Merging
Digital blending combines several photos into one. In Photoshop, you can use tools like FreeHand Blending, Layer Mask, Gradient Mask, Color Range, Luminosity Mask. Like any post-production method, it’s just a matter of correct layering and adjustment. Start from the basics and upgrade little by little until you become a pro real estate photo editor.
Conclusion
The main goal of this real estate photo editing guide is to help you get better photos while saving time and money on editing. By using these easy tips, you can create clear, professional images that make properties look great. Good photos attract more buyers and help your real estate business grow. Having strong, quality images also builds a good reputation for your work. Investing time in effective editing techniques will save you money and increase your efficiency in the long run.
We hope this guide inspires you to elevate your photo editing skills and showcase properties in their best light. What are your favorite editing tips or tricks that have helped you improve your real estate photos? Share your insights and experiences in the comments below, we’d love to hear from you and learn together.
Read Next: Best Online Selling Sites for Photographers
Related Posts